Flushing a tankless water heater means pushing a mild acid solution through the heat exchanger with a small submersible pump, letting it sit for 30 to 60 minutes, then rinsing with clean water. Do it once a year on a normal schedule, twice a year in genuinely hard water, and the heater keeps its flow rate and efficiency instead of slowly choking on calcium and magnesium scale. The whole job takes an hour or two once the water is off.
What you are really fighting is a heat exchanger coated in mineral scale. That coating insulates the heating surface, so the burner or elements work harder, hot water arrives slower, and the unit can eventually shut itself down on an error code. Forum threads on r/Plumbing and r/Home are full of owners hearing that popping noise and watching their hot water pressure drop, and in most cases the fix is a flush, not a replacement.
There is one catch worth saying up front: how to flush a tankless water heater depends on whether yours has flush valves and service ports at all. Plenty of older and budget models do not, and a flush kit that will not connect is the most common reason owners give up halfway through.
It helps to understand what you are cleaning. Hard water carries dissolved calcium and magnesium, and when that water is heated inside the heat exchanger the minerals drop out as solid scale. That scale coats the internal passages and the heating surface itself, which is why symptoms show up as both flow problems and efficiency problems.
Two water conditions change the schedule. Hard water, usually measured above about 7 grains per gallon, roughly doubles the rate of buildup. Properly functioning soft water slows it enough that many manufacturers stretch the interval to three or four years. If you installed a softener recently, flush anyway, because the unit accumulated scale while the water was still hard.
Table of Contents
- What You Need
- How to Flush a Tankless Water Heater: Step-by-Step
- 1. Confirm the Flushing Method for Your Model
- 2. Shut Off Power, Gas, and Water Safely
- 3. Connect a Flush Kit or Suitable Hose
- 4. Flush Until the Water Runs Clear
- 5. Drain, Reconnect, and Test the Heater
- Common Mistakes to Avoid When You Flush a Tankless Water Heater
- Mistakes That Damage a Tankless Heater and When to Call a Pro
- Frequently Asked Questions
- Do I need to flush a tankless water heater?
- Can you flush a tankless water heater without an isolation valve?
- How often should a tankless water heater be flushed?
- What comes out of a tankless water heater when you flush it?
- Is tankless water heater flushing the same as descaling?
- What should I do if my tankless heater still has low hot water flow after flushing?
- Conclusion
What You Need
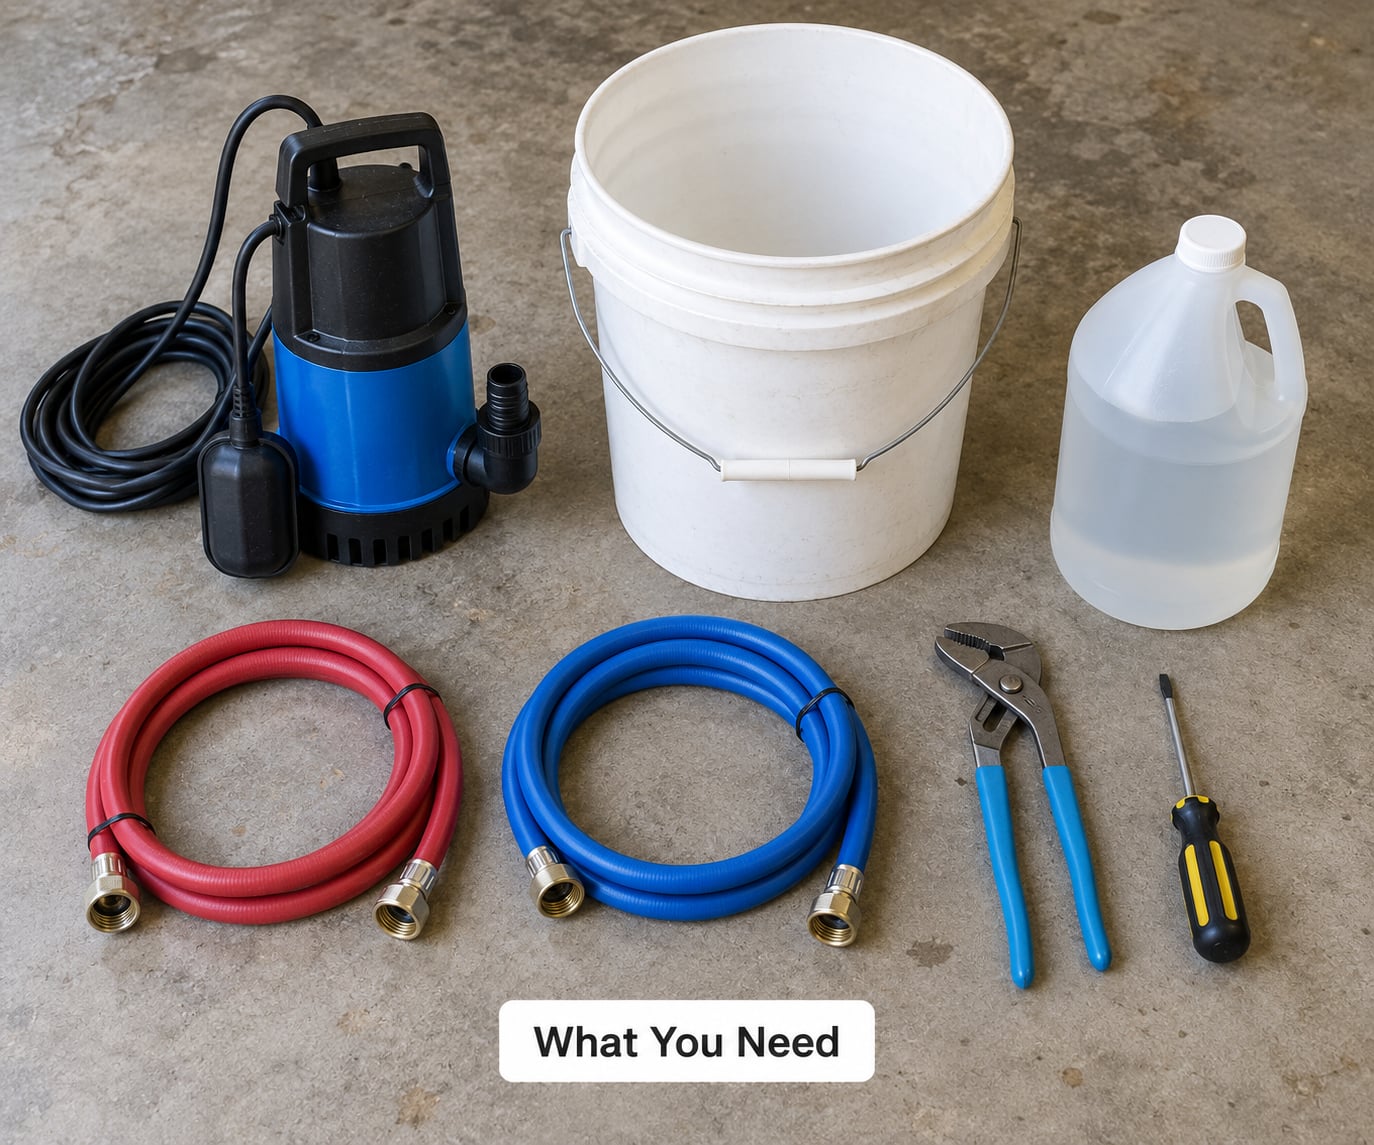
Gather everything before you close a valve. A missing part halfway through the job means a wet floor and a half-flushed heater.
- The owner’s manual for your exact model. Find it by the model and serial number on the unit’s rating plate. The manual decides which flush method is correct.
- A five-gallon bucket for catching discharge water, plus a second container if you want to reserve clean rinse water.
- A submersible utility pump, roughly 1/6 to 1/4 HP, with a hose fitting on the discharge side. This is what moves solution through the closed loop faster than your household pressure can.
- Two washing machine hoses or garden hoses that reach from the heater to the bucket. Washers on the hose ends keep them from splitting off the fittings.
- Descaling solution or food-grade white vinegar, usually 3 to 4 gallons for a residential tankless model. A manufacturer-approved descaler works faster than vinegar.
- Channel-lock pliers and a flathead screwdriver for the hose clamps and valve handles.
- Gloves and eye protection. You will be handling acidic solution and, if the isolation valves do their job, water under pressure.
- A flathead screwdriver or Allen key set for any service port caps, which are frequently captive and easy to lose.
- Paper towels or a rag for the small drips that always show up at a hose connection.
- Optional but very useful: a flush valve kit with isolation valves and service ports, if your heater does not already have them. This is the single most worthwhile addition to a home’s plumbing setup.
Not every tankless heater has the same valve arrangement. Some have factory isolation valves on both the cold inlet and hot outlet. Some have a drain valve at the bottom of the heat exchanger and nothing else. A few have purge ports and nothing else. Knowing which you own takes about two minutes and prevents the most common mistake in this whole process.
Getting the pump size right is less fussy than it sounds. Anything in that 1/6 to 1/4 HP range moves more than enough solution through a residential heat exchanger, and a larger pump mostly just heats the solution faster and makes the job louder. What matters is that the pump can lift the hose run and that it has a fitting for the hose, not the horsepower number on the box.
Do not buy the first kit you see. Match it to the port size on your unit, which on most residential models is a standard NPT thread, and check whether the kit includes full-port isolation valves rather than the thin starter valves that come in cheap kits. Full-port valves open all the way when you turn them, which is what lets you drain the unit for a real flush.
Two optional extras earn their place if you are buying a kit anyway. A small inline filter on the pump discharge catches grit that would otherwise recirculate, and a pair of lead-free hose clamps beats the worm-drive clamps that come in the box, because they are easier to tighten evenly by hand. Skip anything marketed as a flush kit for storage water heaters; those are a different product for a different job.
How to Flush a Tankless Water Heater: Step-by-Step
1. Confirm the Flushing Method for Your Model
Start at the rating plate on the front or side of the unit and write down the brand, model and serial number. Then pull up that manufacturer’s maintenance page, because the flushing method is a manual procedure, not a universal one.
Next, identify what the unit runs on. A gas model has a burner, a flue vent and often a gas valve with a red or yellow handle. An electric model has a power cord or a hardwired connection and a nameplate with wattage. Gas models generally want a gas shutdown in addition to the breaker, and electric models only need the breaker.
Then look at the plumbing. Trace the cold-water inlet pipe into the unit and the hot-water outlet pipe out of it. Look for lever-handled ball valves on each side, and look for threaded service ports near the inlet and outlet. If you see both pairs, you have what you need. If you see neither, read the no-flush-port workaround below before buying anything.
Keep the model number handy. Several manufacturers, including Rinnai, Rheem and Navien, publish specific descaling procedures and some tie warranty claims to following them, so a generic internet method is not a substitute for the manual that shipped with your heater.
One more thing to confirm while you are reading: whether the manufacturer warns against vinegar on your model. A few brands state that acidic cleaners require a specific product and contact time, and using the wrong chemical on a unit still under warranty is the one mistake you cannot undo. If your manual names a required descaler, use that and ignore everything else in this guide.
2. Shut Off Power, Gas, and Water Safely
For an electric tankless heater, switch off the breaker that feeds the unit and confirm the power is dead with a non-contact voltage tester or a multimeter before you touch a fitting. Unplugging is fine only if the unit has a cord; a hardwired model has to be shut off at the breaker.
For a gas tankless heater, do both things: put the gas valve into its documented shutdown position, usually the OFF or pilot position, and switch off the breaker. Forum users worry about this constantly, and the concern is fair. A live burner with a closed water supply will either boil off a little water in the heat exchanger or trigger a lockout, and either way you get a cold shower and an error code.
Close the cold-water isolation valve feeding the heater, then the hot-water valve on the outlet side if one is installed. Open a hot tap somewhere in the house to bleed pressure and drain the piping, and leave that tap open for the duration of the job.
Let the heat exchanger cool. Give it at least 30 minutes, longer if the water was hot when you started. Opening a fitting on a hot heat exchanger risks a scalding spray and, on a gas model, a tripped thermal cutoff.
Label what you have switched off. A breaker and a gas valve in a panel with six other similar-looking handles is a recipe for turning the wrong one back on at the end of the job, and a gas unit restarted with the water side still closed is the single most common way people damage their own heater during a flush. If you have to open a hot tap later, remember the house is still drawing from the cold side of the heater, so the heater needs to stay off until that tap shuts off on its own.
A few owners ask whether the main water shutoff counts. It works, but it means no water anywhere in the house for the duration, including a running toilet, so use the unit’s own isolation valve whenever one exists and reserve the main for a genuine emergency.
3. Connect a Flush Kit or Suitable Hose
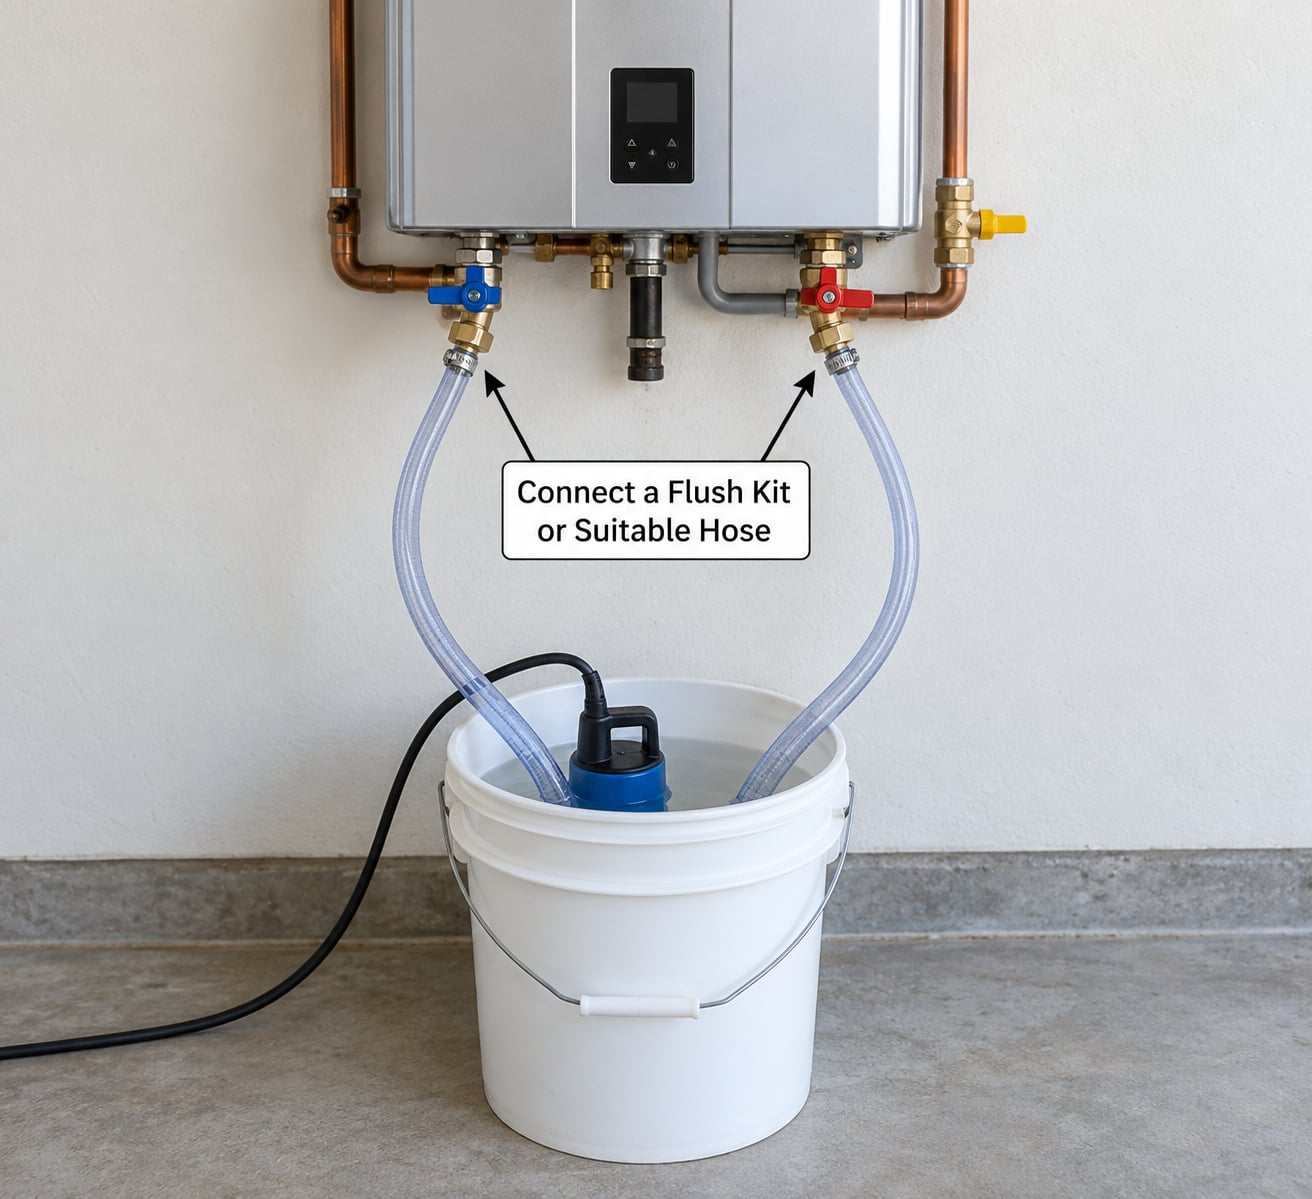
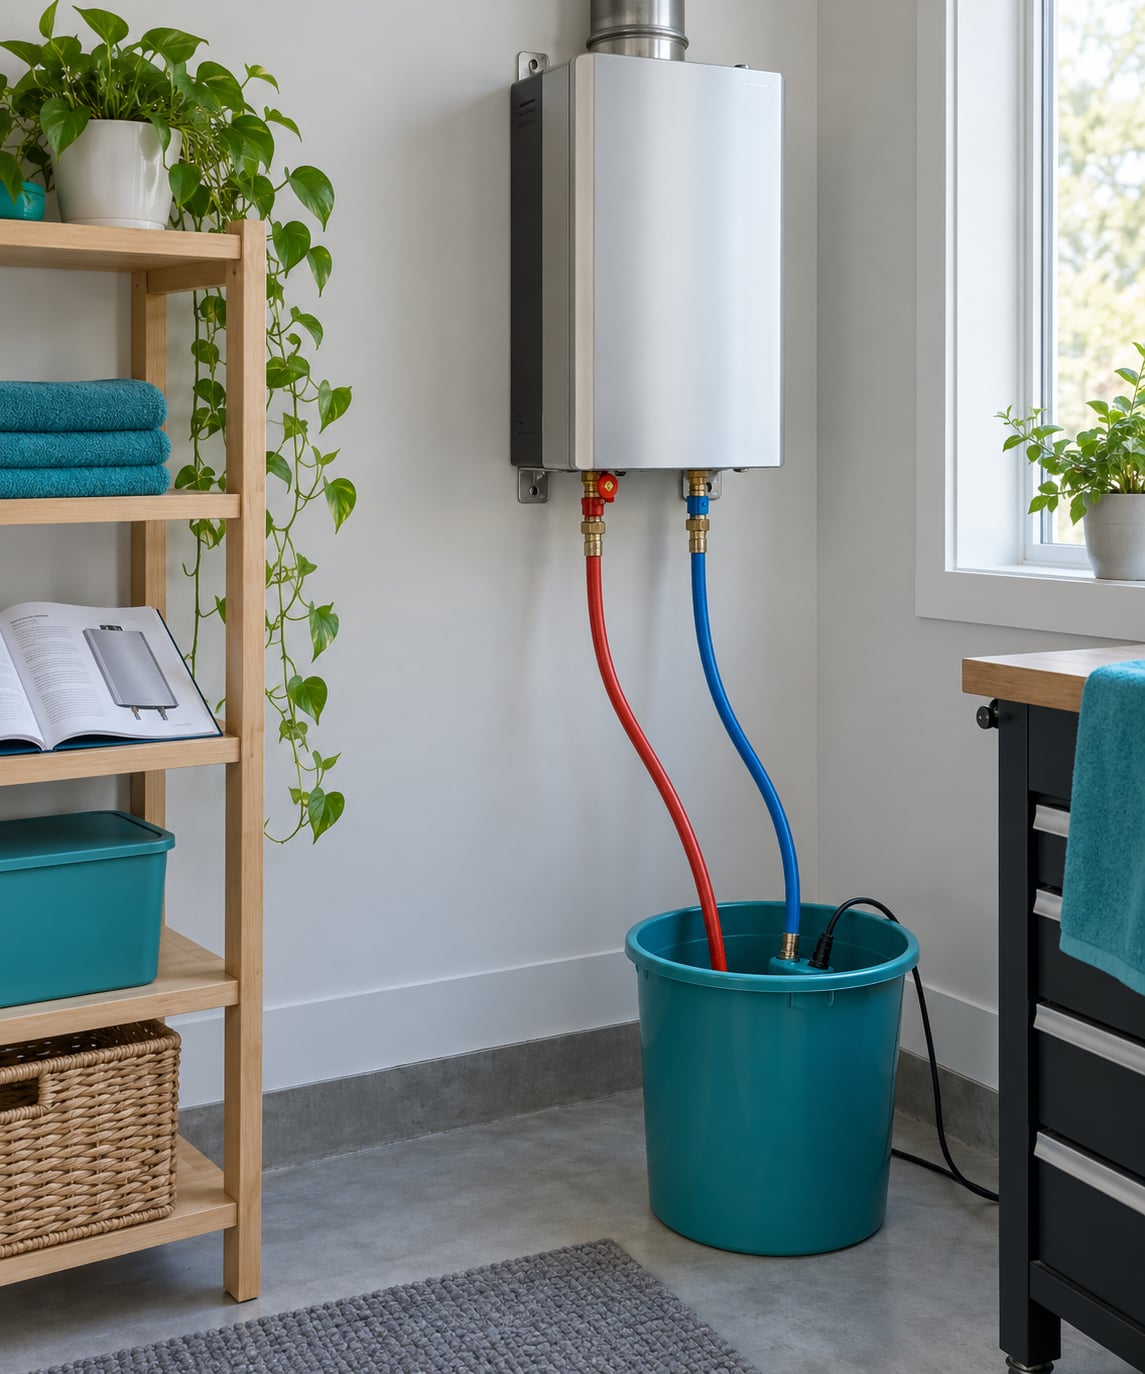
You are building a closed cleaning loop. One hose runs from the pump’s discharge into the cold-water inlet flush valve or service port, and the other runs from the hot-water outlet flush valve into the bucket with the pump sitting in it. Solution gets pushed into the cold side, travels through the heat exchanger, and comes out the hot side into the same bucket.
Fit the hose to the cold inlet first and clamp it snug with pliers. Then fit the second hose to the hot outlet and lower that end into the bucket below the pump’s intake. If your bucket is not tall enough, set the pump on a low shelf beside it so the pump always stays submerged.
Run the pump briefly before you add any solution, with plain water only, to confirm the loop is sealed and the pump can actually push water through the unit. A hose that slides off under pressure, a fitting that leaks, or a pump that hums without moving anything all show up in the first minute, and it is much easier to fix then than after an hour of circulation. This step also flushes out loose debris that has been sitting in the lines.
If the unit has no service ports, you have three options, in order of preference. Install a flush valve kit with isolation valves and threaded ports, which is the correct long-term fix and takes a plumber about an hour. Use the manufacturer’s designated service or drain connection if the manual names one. Or, as a last resort, isolate the heater at the main shutoff, disconnect the cold inlet union, attach a hose to that open pipe end, and run the flush that way, accepting a much longer cycle because you are pushing through a residential pressure regulator and a partly restricted system.
Never cap off the hot outlet and pressurize the cold side. That is how you crack a heat exchanger, and heat exchangers are the single most expensive part of a tankless heater.
4. Flush Until the Water Runs Clear
Open the cold inlet valve partway so solution begins to move, then fully open it. The bucket should fill within a few minutes, and the water coming out will look like weak tea or worse on a neglected heater. That color is the dissolved scale leaving the heat exchanger.
Now add the descaling solution. Pour it into the bucket with the pump sitting in it, keep the pump submerged, and switch the pump on. Most people run the pump at low speed for 30 to 60 minutes. Vinegar needs the longer end of that range because it is weaker; a manufacturer-approved descaler usually works in 30 minutes.
Which liquid you use matters more than most guides admit. Food-grade white vinegar is roughly 5% acetic acid, it is cheap, and it works, but it needs about twice the contact time of a dedicated descaler and it smells strongly during the cycle. Household limescale removers built on citric or sulfamic acid are faster and rinse cleaner, though some are not approved for every heat exchanger material, so check the label. Concentrated vinegar at 30% or higher is tempting because it is stronger, but repeated exposure at that concentration can attack copper and some sealants, so use standard white vinegar unless the manufacturer of your heater explicitly approves the stronger version. Whatever you choose, match the volume to the size of the unit, and never mix products in the same bucket.
Run one full tank of solution through the unit, then refill with clean water and run a second tank. Keep going until the discharge from the hot side runs clear. Two tanks is normal on a unit that has never been flushed. Five is not unusual on one that has.
Watch the bucket rather than the clock. If the water stops clearing after several full cycles and the unit still has low flow, the problem probably is not scale, and more acid will not help. Stop, finish the rinse, and read the notes on calling a pro further down.
The discharge tells you a lot. On a heater that has never been flushed, the first tank out is often the color of weak tea and carries a faint sour or metallic smell. Some owners report grit at the bottom of the bucket, which is sediment that had settled in the heat exchanger rather than scale still clinging to it. As the flush progresses, the color fades, and when it runs clear with no odor you are done with the solution pass. If it runs cloudy, stops improving, and then runs clear only on the fourth or fifth cycle, that is normal for a neglected unit and is not a sign you did something wrong.
On a gas model, some manuals allow a short low-flow hot water draw during circulation to help dislodge debris. Check the manual first, and never run the burner with the cold inlet closed.
5. Drain, Reconnect, and Test the Heater
Rinse twice more with clean water until the discharge runs clear with no scent. Then switch off and unplug the pump and drain the hoses, because leaving acidic solution sitting in a pump or against a metal hose end corrodes it slowly and quietly. This is a small step that saves a part you would otherwise buy again next year.
Close the hot outlet valve and the cold inlet flush connection, remove the hoses, and reinstall any port caps you removed, snug but not strained. Restore the hot-water isolation valve.
Open the cold-water supply valve slowly, then open a hot tap and let it run until water flows steadily with no sputtering. That sputtering is an air lock in the hot line, and it clears on its own once the air passes. Cold water gushing briefly from a hot tap is normal and means the line is full.
Restore energy in the documented order. For a gas model, gas valve open, breaker on, and confirm the unit goes through its startup sequence without a fault light. For an electric model, breaker on and confirm the element or elements engage.
Run hot water at a full flow for two or three minutes and check every connection you touched for weeping. Then test what you actually flushed for: if the first shower is noticeably stronger and heats faster, the flush worked.
Dispose of the spent solution by pouring it down a household drain with plenty of cold water running. It is a mild acid with dissolved calcium, not a hazardous waste, but do not pour it into a garden bed or onto concrete, and do not mix it with bleach.
While everything is apart, take five minutes for the rest of the unit. Pull the cold inlet filter and rinse it under the tap, and on a gas model check the vent or flue connection for scale, debris and any sign of a blocked or damaged exterior vent hood. A blocked vent is a carbon monoxide problem, not a flushing one, but it is the kind of thing you will regret leaving until winter.
Finally, write the date in a log somewhere you will actually look, whether that is a note on the fridge or a photo of the rating plate with the date next to it. Tracking intervals is how you spot the year-to-year change in flow that tells you a unit is heading toward trouble.
Common Mistakes to Avoid When You Flush a Tankless Water Heater
- Flushing a live heater. A gas burner or live elements with a closed water side cause a lockout at best. Kill the breaker and the gas valve before you open anything.
- Using the isolation valve when you meant the flush valve. The isolation valve on the cold inlet controls the household water. The flush valve or service port is the fitting you hose into. Confusing them is why some first-time flushes barely move any water.
- Forgetting to release trapped pressure. Open a hot tap after closing the supply, and crack the hose connection slowly. A hose that blows off sprays scalding water across the wall.
- Disconnecting with nothing under the fitting. Even a properly closed heater usually holds a few gallons in the heat exchanger. Have the bucket in place before the last quarter turn.
- Over-tightening hose clamps and fittings. Cracked plastic inlet fittings are an expensive, pointless way to end a good flush. Hand-tight plus a quarter turn is usually enough.
- Treating a flush as a complete descaling job. Flushing loosens scale from the water side. Scale welded to the burner, the air path or the vent needs a technician with a scope and brushes.
- Leaving solution in the pump and hoses. Rinse the pump and the metal hose ends with clean water until it runs neutral, then dry them.
- Skipping the inlet filter. While the water is off, pull and rinse the inlet filter on the cold side. It is usually a small mesh screen and it clogs long before the heat exchanger does.
Mistakes That Damage a Tankless Heater and When to Call a Pro
The mistake above that shows up most often in plumbing forums is the missing flush port. Homeowners buy a kit, discover the ports do not exist on their model, and conclude the unit cannot be flushed. That conclusion is wrong. The kit is the fix, not the requirement, and once the isolation valves and threaded service ports are in place the procedure on this page works exactly as written.
Some jobs are not DIY. Call a plumber or a tankless service technician if there is no shutoff anywhere on the cold inlet, if the copper is sweated directly with no union to disconnect, if the unit sits in a closet with no room to set a pump, or if the gas train is inside a sealed chase you are not meant to open.
Honestly, most of the awkward installations are still solvable with a flush valve kit, and the kit itself is a small plumbing job. What justifies a pro is not difficulty, it is the consequence of getting it wrong. A cracked heat exchanger, a gas train opened by mistake, or a unit that never gets drained properly are all far more expensive than the service call would have been.
Call for a full descaling service rather than a flush when the unit shuts down on a recurring error code, when hot water flow is low across every tap in the house, or when the discharge stays cloudy after four or five full cycles. Those symptoms point to scale on the burner and in the flue path, which means pulling the unit apart.
If the unit is on a recirculation loop or feeds a hydronic air handler, the picture changes. Those systems hold a full volume of water at temperature, which keeps scale warm and actively growing, and the loop itself may hold its own sediment that a simple flush on the unit will not touch. A tankless heater serving a recirculation loop generally needs a more thorough cleaning and a tighter schedule than a unit serving two bathrooms.
Getting a straight answer on cost is easier than most homeowners expect. Ask each plumber or service company for the two numbers separately: the descaling service, and the price of a comparable replacement unit installed. Comparing them on paper ends the flush-or-replace debate faster than any opinion you will get over the phone.
Warning signs that mean stop and reassess: any sign of gas odor, a gas leak you can hear, corrosion or weeping at the inlet or outlet, a scorched smell from the cabinet, or water in the flue. None of those are flushing problems.
On the flush-or-replace question that comes up constantly on plumbing forums: a tankless heater with a good heat exchanger and a scale problem is worth flushing, because the exchanger is the expensive part and flushing is far less than a new unit. A heater that is already past its expected service life, has a failed heat exchanger, or has a burner that will not hold ignition is a replacement conversation, not a flushing one. Ask for a condition opinion before spending money either way.
Two more honest notes. Owners often worry that pouring several gallons of vinegar annually is wasteful, and it is a small amount compared with the water a household uses in a week, but the neutralization cost is real and a softener-fed home can stretch the interval. And the maintenance is genuinely worth the hour: scale is the thing that shortens the life of a tankless heater more than anything a homeowner controls.
If you would rather watch the procedure than read it, the AI Overview and the video results for this question pull almost entirely from plumbing channels, and a labelled diagram of the closed loop is the fastest way to see whether your own plumbing matches. Either way, have the manual open on your phone while you work through it. That one habit prevents nearly every mistake on the list above.
Frequently Asked Questions
Do I need to flush a tankless water heater?
Yes, if you want to keep your flow rate and efficiency. Hard water minerals precipitate as calcium and magnesium scale on the heat exchanger, which insulates the heating surface and narrows the water path. The symptoms are low hot water volume, slow heat-up, popping or rumbling noise, rising energy use and eventually error-code shutdowns. Manufacturers generally call for annual flushing, and the interval is a guideline, not a rule.
Can you flush a tankless water heater without an isolation valve?
Usually yes. The isolation valve is a convenience, not a requirement. Without one, close the main water supply or whatever upstream valve feeds the cold inlet, open a hot tap to relieve pressure, and disconnect the cold inlet union to attach your hose. Flow will be slower because you are pushing through the whole house line. Installing a flush valve kit with isolation valves and service ports is the better long-term answer.
How often should a tankless water heater be flushed?
Once a year on ordinary water. In genuinely hard water, every six months is more realistic because scale builds faster. With a properly working softener, many manufacturers stretch the interval to three or four years. Always defer to the manual for your model, since some require a specific procedure to keep the warranty intact. If you notice popping noise or reduced flow, flush now rather than waiting for the next scheduled service.
What comes out of a tankless water heater when you flush it?
On a neglected heater, the first discharge is often cloudy and grey-brown, sometimes with visible grit, and it can smell sour or metallic. That is dissolved scale and sediment leaving the heat exchanger. Keep flushing until the water runs clear and the odor is gone. The color tells you how much scale came loose, but a heater that only ever ran cloudy at the first tap and stayed cloudy after several full cycles probably has a different problem.
Is tankless water heater flushing the same as descaling?
For most owners, the two words describe the same job. Flushing with vinegar or a mild descaling solution is the standard way to descale the water side of a tankless heater, because the acid dissolves calcium and magnesium deposits and carries them out. A full descaling service goes further: it opens the unit, removes the heat exchanger, and mechanically scrapes the burner and flue path where flushing cannot reach.
What should I do if my tankless heater still has low hot water flow after flushing?
Run two more full rinse cycles, because scale often clears on the second pass. If flow is still low, check the aerators and showerheads for debris, and confirm both isolation valves are fully open. If the unit is old, a failing inlet filter or a partly blocked pressure regulator upstream can look exactly like a scale problem. Persistent low flow across every hot tap after a clean flush points to a mechanical issue a technician needs to inspect.
Conclusion
Start by pulling the manual for your model number and confirming whether your heater has flush valves and service ports, because that single fact determines the entire procedure. If it does not, get a flush valve kit installed before anything else, and the job becomes straightforward every year after that.
Then set the interval from your water rather than from a generic rule of thumb: annual for ordinary water, every six months in hard water, longer if a softener is doing its job. Flushing on a schedule is far cheaper than replacing a heat exchanger, and it is the maintenance step that does the most for a tankless heater’s lifespan.