Learning how to patch a hole in drywall comes down to one thing: matching the method to the size of the opening. Nail holes and screw holes get spackle. Anything from about 1/2 inch up to 4 inches gets a mesh patch. Bigger than that needs a cut-in piece of drywall screwed to backing wood.
Most small repairs take under an hour of hands-on work. The annoying part is drying time, because joint compound needs 12 to 24 hours per coat, and a good repair takes two or three coats. Plan on a spread of two days, or use a fast-drying compound if you need it done tonight.
This guide covers the four methods, the materials for each, and the judgment calls nobody explains well: when to square up a ragged hole, whether you need a stud behind the repair, and how to tell that compound is dry enough to sand. Everything here applies to drywall as the current 2026 standard in most homes. Old plaster and lath walls need a few extra steps, which I cover near the end.
Table of Contents
- What You Need
- Under 1/2 inch: spackle and a putty knife
- 1/2 inch to 4 inches: mesh patch and joint compound
- Over 4 inches: drywall piece plus backing
- Safety gear for every job
- Spackle or joint compound: which one do you need?
- Step-by-Step
- 1. Inspect the Damage and Choose a Repair
- 2. Trace and Cut the Opening
- 3. Attach the Drywall Patch
- 4. Apply Joint Compound in Thin Layers
- 5. Sand, Prime, and Paint
- 6. Repair Larger or Structural Damage
- Common Mistakes
- Frequently Asked Questions
- Can I patch a hole in drywall myself?
- What is the easiest way to fix a small hole in drywall?
- Should I use a drywall plug, mesh patch, or a piece of drywall?
- How long does joint compound need to dry before sanding?
- Do I need to prime drywall before painting a patch?
- When should I call a professional instead of repairing the wall myself?
- Conclusion
What You Need
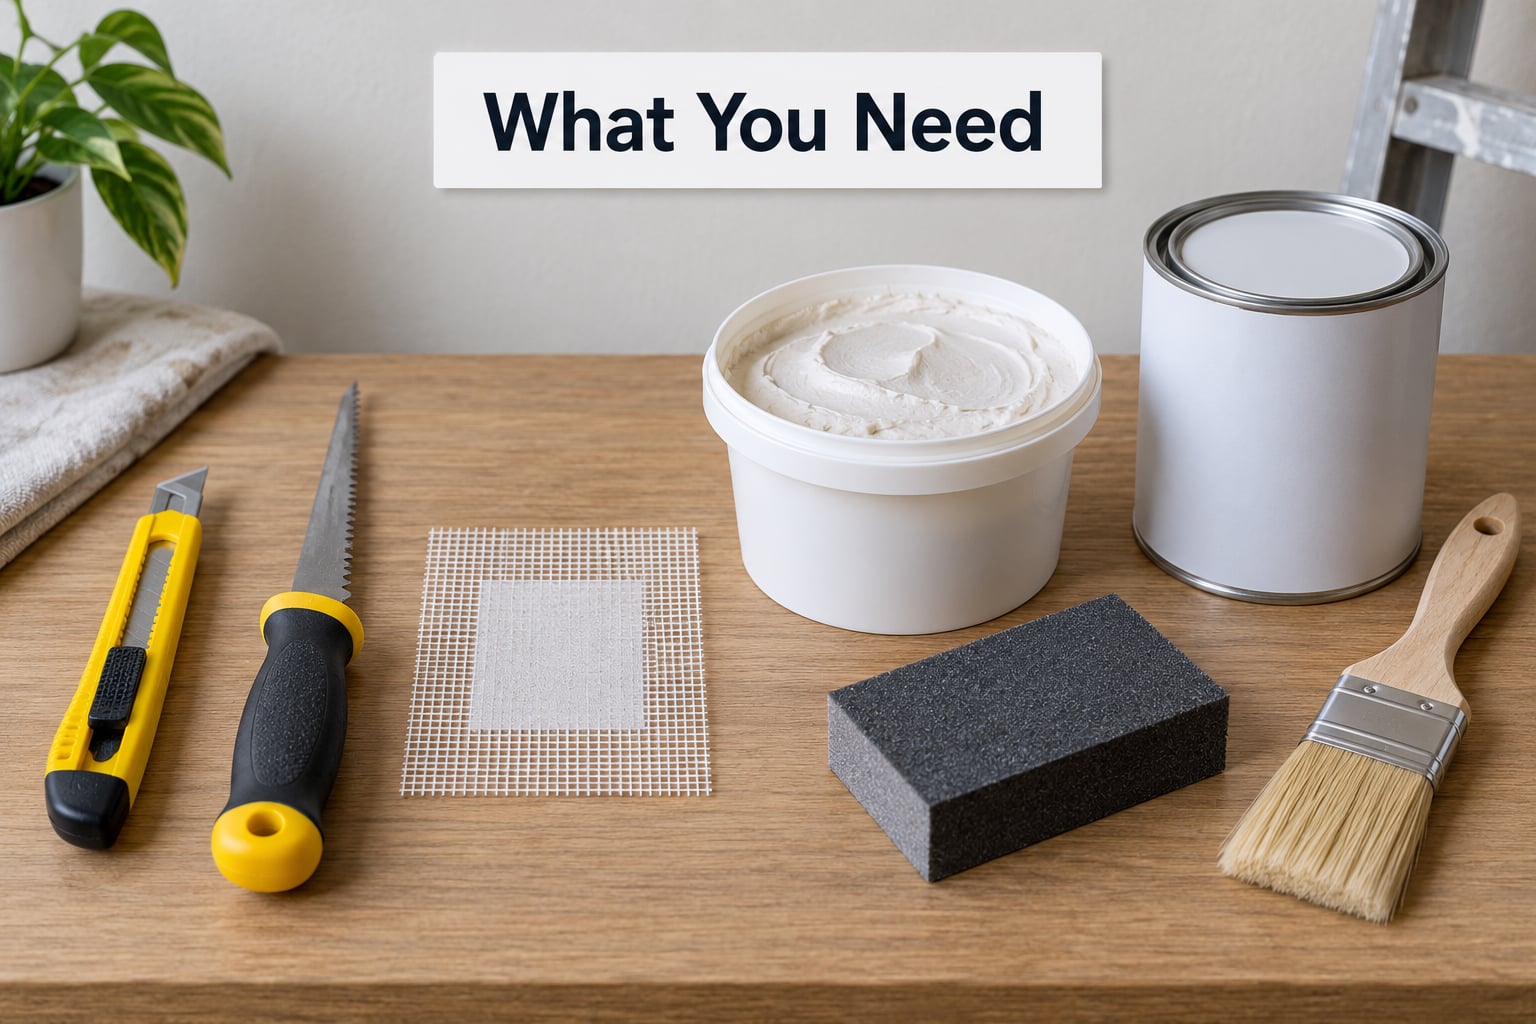
Start by measuring the hole and checking for a stud. Those two facts decide everything else on your list, so gather supplies after you know which tier you are in.
Under 1/2 inch: spackle and a putty knife
- Spackle or patching compound, one tub
- 4 to 6 inch putty knife or taping knife
- 120 to 150 grit sandpaper or a sanding sponge
- Small paintbrush and matching paint
1/2 inch to 4 inches: mesh patch and joint compound
- Self-adhesive aluminum or fiberglass mesh patch, sized to cover the hole with 2 inches of overlap on every side
- All-purpose joint compound, ready-to-use or dry mix
- 6 inch and 10 inch taping knives for feathering
- 120 to 150 grit followed by 200 to 220 grit sandpaper
- Utility knife, drywall saw, pencil, and straightedge
- Primer, paint, and a roller
Over 4 inches: drywall piece plus backing
- One sheet of drywall matched to your wall thickness, either 1/2 inch or 5/8 inch
- Two wood furring strips or 1×2 cleats, at least as long as the opening
- 1 1/4 inch drywall screws and a drill
- Drywall tape or a mesh tape strip for the seams
- Stud finder
Safety gear for every job
Put on eye protection before you cut anything, because drywall dust and gypsum splinters are genuinely irritating. Wear an N95 dust mask while sanding, especially indoors or in a small room. Open a window or run a fan, since sanding dust gets everywhere.
Spackle or joint compound: which one do you need?
They are not the same product, even though plenty of people swap them for tiny holes. Spackle dries fast and shrinks a little, which is perfect for filling nail holes. Joint compound, also called drywall mud, dries slower, spreads thinner, and barely shrinks, which makes it the right choice for anything wider than a nail hole.
| Material | Dries in | Shrinks | Best for |
|---|---|---|---|
| Spackle | 15 to 60 minutes | Noticeably | Nail holes, screw holes, small dents |
| Setting-type compound | 45 to 90 minutes | Very little | Holes under 1 inch when you need speed |
| All-purpose joint compound | 12 to 24 hours | Very little | Mesh patches, seams, any hole over 1/2 inch |
Dry mix is worth the extra effort for beginners because you only mix what you will use in 30 minutes. Let mixed compound sit on a lid or piece of cardboard between coats, never back in the bucket, or it skins over and goes lumpy.
Step-by-Step
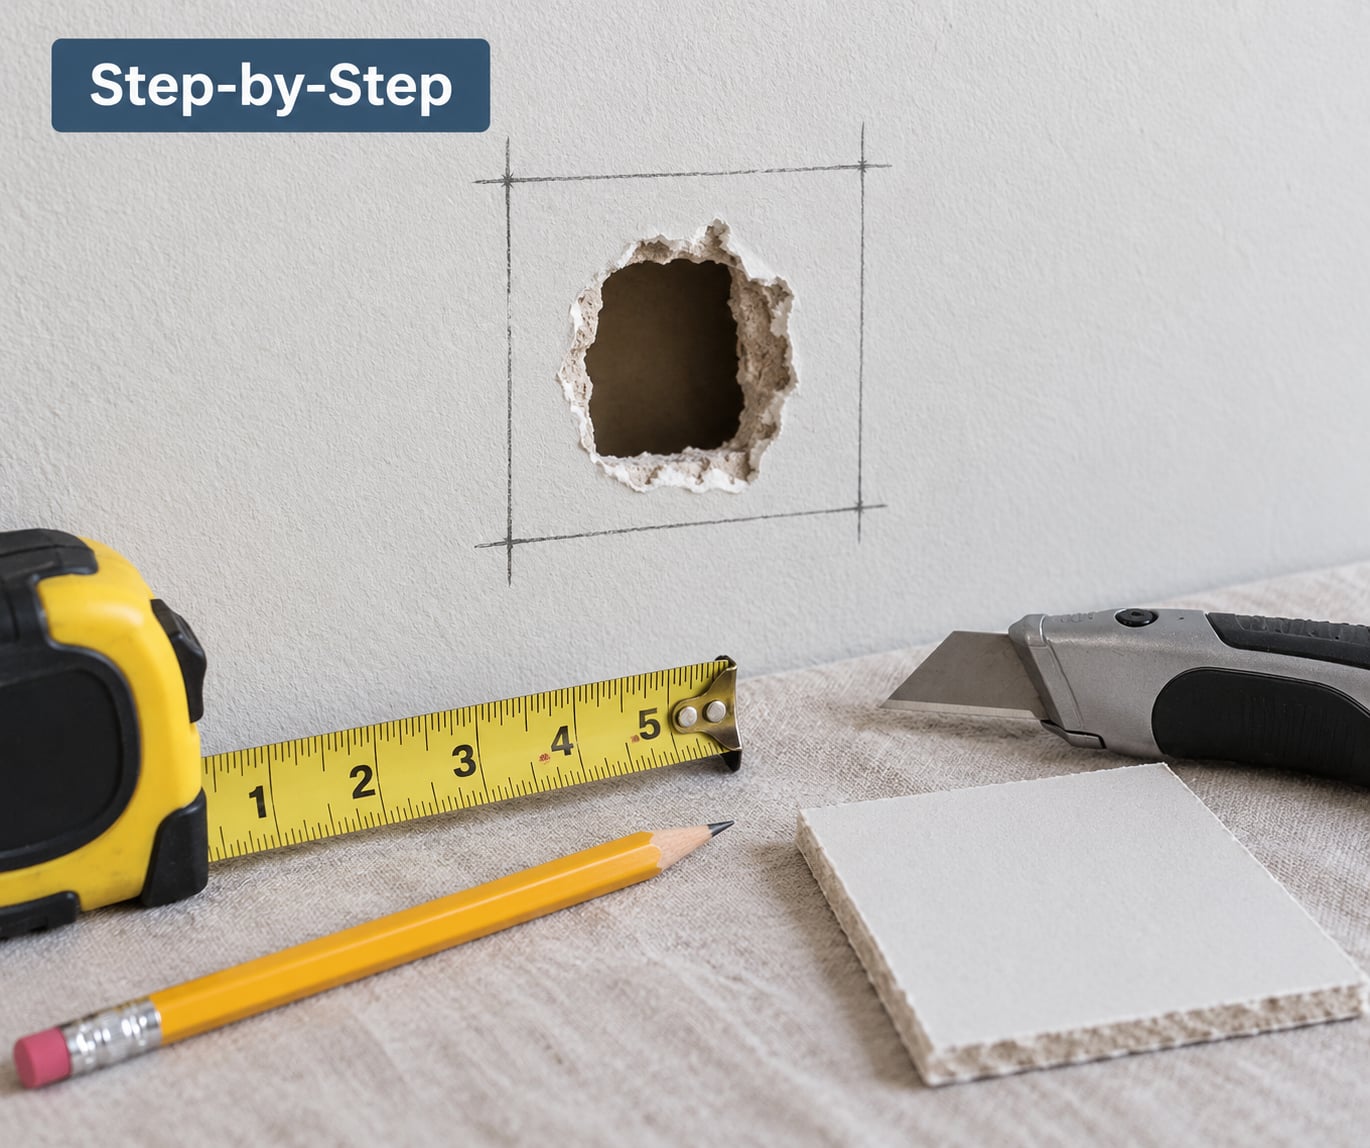
1. Inspect the Damage and Choose a Repair
Put on your safety glasses, then measure the opening at its widest point and check for framing with a stud finder. Note whether you can reach a stud on either side of the hole.
Before you cut, look inside the cavity with a flashlight. You are checking for live wiring, plumbing, or insulation, and for water damage or mold. Forum DIYers hit this problem more often than guides admit: a 4 inch opening left by an electrician is usually the cleanest possible hole to repair, but it can be sitting right next to a cable.
Reach out and flag these warning signs before touching a tool:
- Soft, crumbly drywall or brown staining means water got in, and the source needs fixing before any patch
- Black or green spotting means mold, which needs remediation rather than a cover-up
- Cracks that run diagonally from a corner, or a wall that flexes, are structural, not cosmetic
- Damage around a nail or screw head wider than the fastener itself usually means framing is loose
Popped screws are the commonest version of this. Drive them back in with a drywall screw set a quarter inch deeper than the paper, or pull them out and fill the hole like any small hole.
2. Trace and Cut the Opening
Draw a square or rectangle around the damage so all four edges are straight. Professionals do this even on small holes, and it is the single trick that separates a repair that disappears from one that shows forever.
Cut along your lines with a drywall saw or keyhole saw, scoring the paper face first with a utility knife. Keeping the cuts straight stops the gypsum from crumbling outward and prevents you from enlarging the hole by accident. Fear of making it bigger is the most common reason people leave ragged edges in place, and those torn edges are exactly what makes a patch visible later.
Trim back any loose or torn paper around the opening so the new patch sits against a clean gypsum edge. Professionals cut the existing paper back to match the outline of the replacement piece, leaving a consistent border that mud covers evenly. A pocket of trapped paper or crumbling gypsum behind the patch is what causes edges to pop out months later.
Trim existing drywall anchors out with pliers, or knock them flush and fill over them. If you are taking down a wall-mounted TV bracket, the holes are usually large and oval, which makes them an easy candidate for a square cut plus a mesh patch.
3. Attach the Drywall Patch
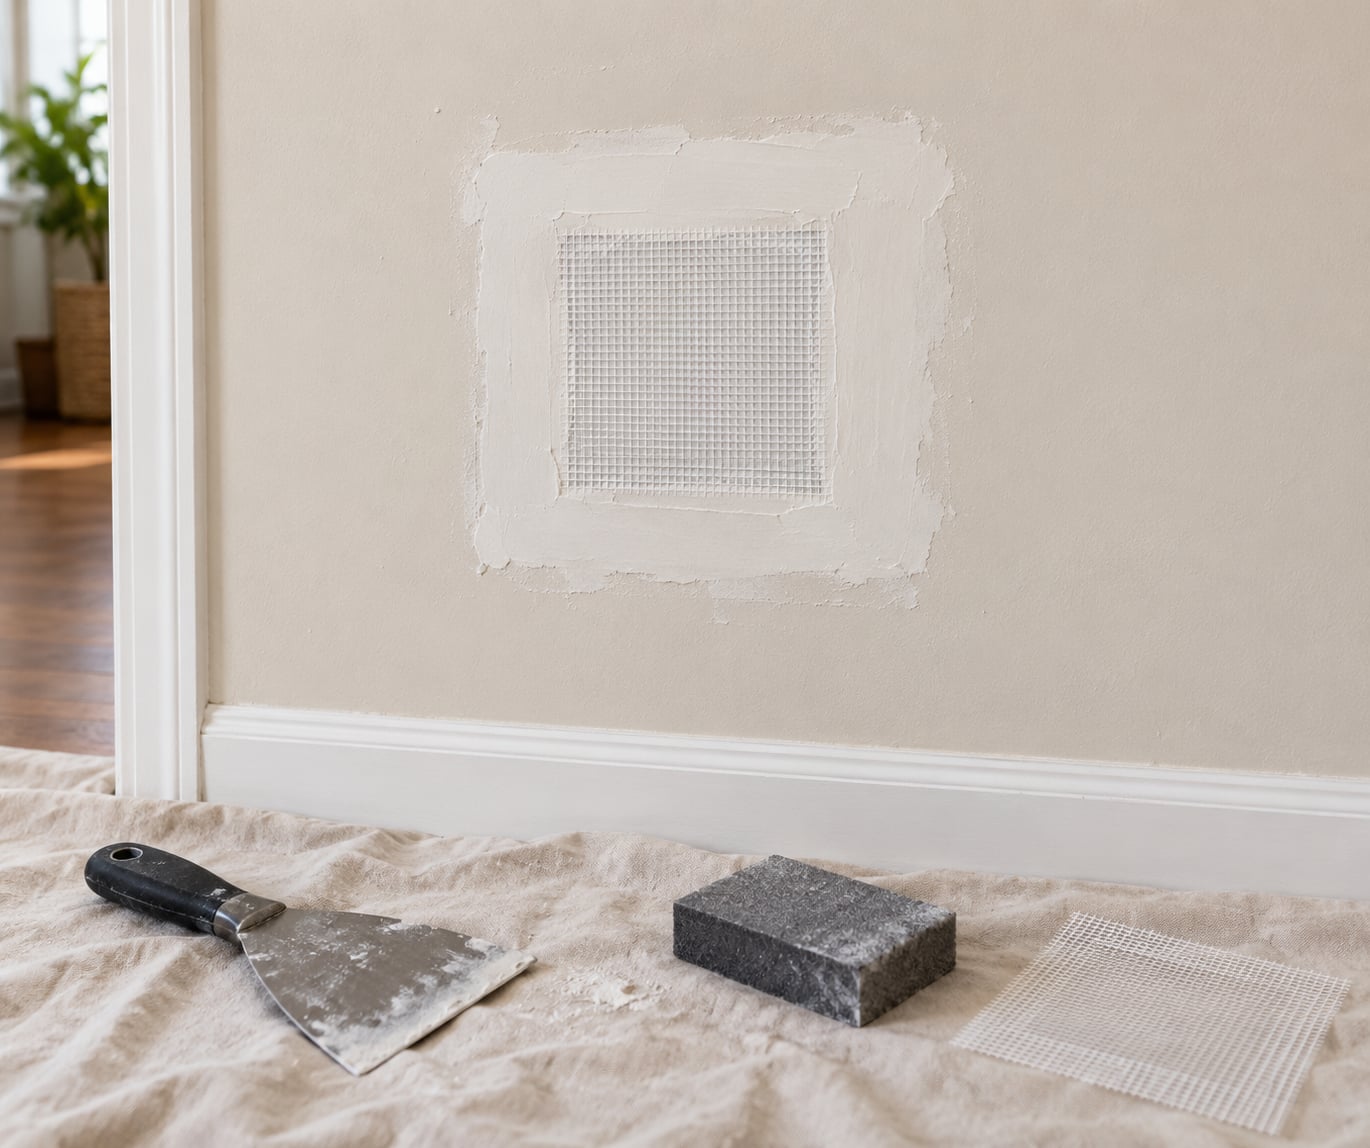
For holes between 1/2 inch and 4 inches, peel the backing off the self-adhesive mesh patch, center it over the opening, and press it flat. The mesh needs at least 2 inches of overlap onto sound wall on all four sides, so buy a patch bigger than the hole if the nearest size is tight.
Run a thin coat of compound over the mesh and let it anchor to the wall while you work on the next step. The wet compound sticks down the lifting edges of mesh, which is the number one reason patches curl and show a ridge after painting.
For a cut-in piece on holes over 4 inches, hold your drywall piece against the opening and trace it. Score the face, snap the excess off, and round the corners slightly rather than leaving sharp angles. Sharp corners concentrate compound into a point that dries into a visible line.
Now secure it. If you can reach a stud on each side, drive screws into the framing through the patch. If you cannot, stop and read the next section, because nothing behind that screw head means nothing holding the patch.
4. Apply Joint Compound in Thin Layers
Load a 6 inch knife with compound, hold it at about 30 degrees to the wall, and pull it across the patch leaving a thin film about 1/16 inch thick. Let the blade edge ride over the mesh so the weave disappears.
Thin coats are the whole game. A thick coat dries unevenly on the surface while staying damp underneath, then cracks or shrinks into a dip you have to sand back out. Two or three skim coats beat one heavy coat every time.
Feather the edges by angling the blade more as you reach the perimeter, so the compound thins to nothing at the transition instead of stopping at a hard lip. Hold the knife against the wall and pull it straight out at the end of the stroke to avoid a ridge.
Check for ridges under raking light from a lamp held at a low angle. Ridges are easier to fix now than after sanding. Let the coat dry fully, which is 12 to 24 hours for all-purpose compound, then apply the next coat slightly wider than the last.
5. Sand, Prime, and Paint
Touch the compound with the back of your finger. If it feels even slightly cool or soft, it is not ready. Partially dry compound gums up the sandpaper and pulls out in clumps, which is the fastest way to turn a good repair into a mess.
Sand with 120 to 150 grit first to knock down high spots, then finish with 200 or 220 grit for a smooth surface. Use a sanding block for flats and a sanding sponge for tight spots around trim and corners. A pole sander saves your neck on a big wall, but it is easy to gouge with, so work in small overlapping circles and keep it moving.
Prime any bare gypsum paper, because new drywall paper drinks paint unevenly and leaves a blotchy patch no matter how good your color match is. A short nap roller matches a smooth wall better than a brush. Two light coats beat one heavy coat, and the second one hides lap marks.
On a textured wall or ceiling, paint match alone will not save you. Spray texture over the dried repair with a canned texture product, or use a stipple roller with a nap matching the existing surface. Let the texture dry before you paint over it, and feather it beyond the patch so the boundary disappears.
Match sheen too. Flat walls need flat paint, and eggshell on a flat patch catches light differently than the wall around it. If you have no leftover paint, take a chip about the size of a coin to the store and let them tint-match it, then test a dab in a closet corner before you commit.
6. Repair Larger or Structural Damage
How to patch a drywall hole with no stud behind it is its own method, and it is the case most guides skip. Run a furring strip across the cavity behind the opening, spanning from one stud to the next, then screw the drywall piece into that strip. Community advice on r/HomeImprovement is consistent on this: a furring strip plus screws works whether or not you have stud access, and construction adhesive is not a substitute because it lets the patch flex and crack along the seam.
Studs usually sit 16 inches on center, so a strip a bit longer than the opening almost always finds framing on both ends. For a hole big enough to lose the studs on both sides, screw cleats to whatever framing remains or add blocking so the screws have something solid to bite into.
Apply paper tape or mesh tape over every seam between the new piece and the old wall, then bury it under compound. Skipping the tape on seams is how a repair that looked perfect in week one starts showing a hairline crack in month three.
On plaster and lath walls, check the plaster thickness before you cut a replacement piece. A piece that is too thin sits recessed, and one that is too thick stands proud and casts a shadow. Readers of DIY tutorials flag this constantly, and on older homes with intact lath you should pack the cavity with compound first so the patch has something solid behind it.
Stop and call a trade professional when the damage is structural: a sagging or bowed ceiling, a crack that widens, a wall that moves when you push it, water damage with an unknown source, or mold. Electrical work, gas lines, and load-bearing members are not DIY territory under any circumstances, and code may require a permit for a repair that touches framing.
Common Mistakes
Almost every visible patch comes down to one of ten mistakes. Here they are with the fix.
Too much compound in one coat. It dries on the surface while staying damp inside, then cracks or sinks. Fix: 1/16 inch coats, two or three of them, each wider than the last.
Skipping the feathering. A hard edge where compound meets wall reads as a visible line even under paint. Fix: angle the blade more at the perimeter of every stroke.
Sanding before it is fully dry. You get clumps and torn paper, not a smooth surface. Fix: wait until the compound feels room temperature and hard all the way through, not just on top.
Painting over the repair without priming bare paper. The patch stays blotchy forever. Fix: prime any exposed gypsum paper before the topcoat.
Leaving the hole ragged instead of squaring it. Jagged edges need compound thick enough to fill a gap, which then cracks. Fix: cut a clean square or rectangle with a drywall saw.
Using a patch that is too small. Less than 2 inches of overlap lets the mesh edges sit proud of the wall. Fix: pick a patch that overhangs the opening by 2 inches on every side.
Rounded patch edges left as sharp corners. Corners concentrate compound into a ridge that dries into a visible line. Fix: round the corners of a cut piece slightly before setting it.
Skipping tape on the seams of a cut-in piece. The joint opens into a hairline crack later. Fix: tape every seam, then bury it under compound.
Ignoring texture on a textured wall or ceiling. A smooth patch on an orange peel wall is obvious from across the room. Fix: spray texture or stipple before painting.
Cutting without checking what is behind the wall. Wires and pipes do not care how good your technique is. Fix: flashlight the cavity first, and shut off power at the breaker before working near any wiring.
Frequently Asked Questions
Can I patch a hole in drywall myself?
Yes, for nearly every hole a homeowner would encounter. Nail holes, popped screws, dents, and doorknob punctures up to about 4 inches are straightforward once you match the method to the size. Above 4 inches you need a drywall piece and backing wood, which is more work but still within reach. Call a professional for structural cracks, sagging ceilings, mold, or anything involving wiring or plumbing.
What is the easiest way to fix a small hole in drywall?
For holes under 1/2 inch, spackle and a putty knife is the fastest fix. Push spackle into the hole, let it dry, sand it flush, then touch up the paint. The whole job takes about fifteen minutes. If the hole is dented rather than punched through, skip the spackle and just sand the dent down before painting.
Should I use a drywall plug, mesh patch, or a piece of drywall?
A drywall plug is for filling a hole you cut yourself, like the puzzle-piece technique where you trim a plug from scrap drywall. A mesh patch is self-adhesive and covers holes from about 1/2 inch to 4 inches. A full piece of drywall screwed to backing is for openings over 4 inches. Size is the deciding factor, not preference.
How long does joint compound need to dry before sanding?
All-purpose joint compound needs 12 to 24 hours per coat before sanding, and longer in cold or humid rooms. Setting-type compound hardens in 45 to 90 minutes. Spackle is ready in 15 to 60 minutes. Test with the back of your finger: if it feels even slightly cool or soft, keep waiting.
Do I need to prime drywall before painting a patch?
Prime any bare gypsum paper, because new paper absorbs paint differently and leaves a blotchy spot that no amount of extra coats will fix. If the patch is fully covered in compound and sanded smooth, one coat of paint is usually enough. On textured walls, match the texture with spray texture or a stipple roller before painting.
When should I call a professional instead of repairing the wall myself?
Call someone when the damage is structural rather than cosmetic: a sagging or bowed ceiling, cracks that widen, a wall that moves when pushed, or water damage with an unknown source. Mold needs remediation, not a patch. Electrical, gas, and load-bearing work should stay with licensed trades, since code may require a permit.
Conclusion
Measure the hole, check for a stud and for anything electrical behind it, and pick the method that matches the size: spackle under 1/2 inch, a mesh patch up to 4 inches, a cut-in piece on backing wood beyond that.
Then cut a clean square opening, trim back loose paper, secure the patch with screws or adhesive mesh, and build the surface up in thin coats with a full dry time between each one. When the final coat is hard and room temperature, sand it through 120-to-150 grit and finish with 200 or 220, prime any bare paper, match the texture, and paint.
That is genuinely all there is to how to patch a hole in drywall. The only part that rewards patience is waiting for the compound.