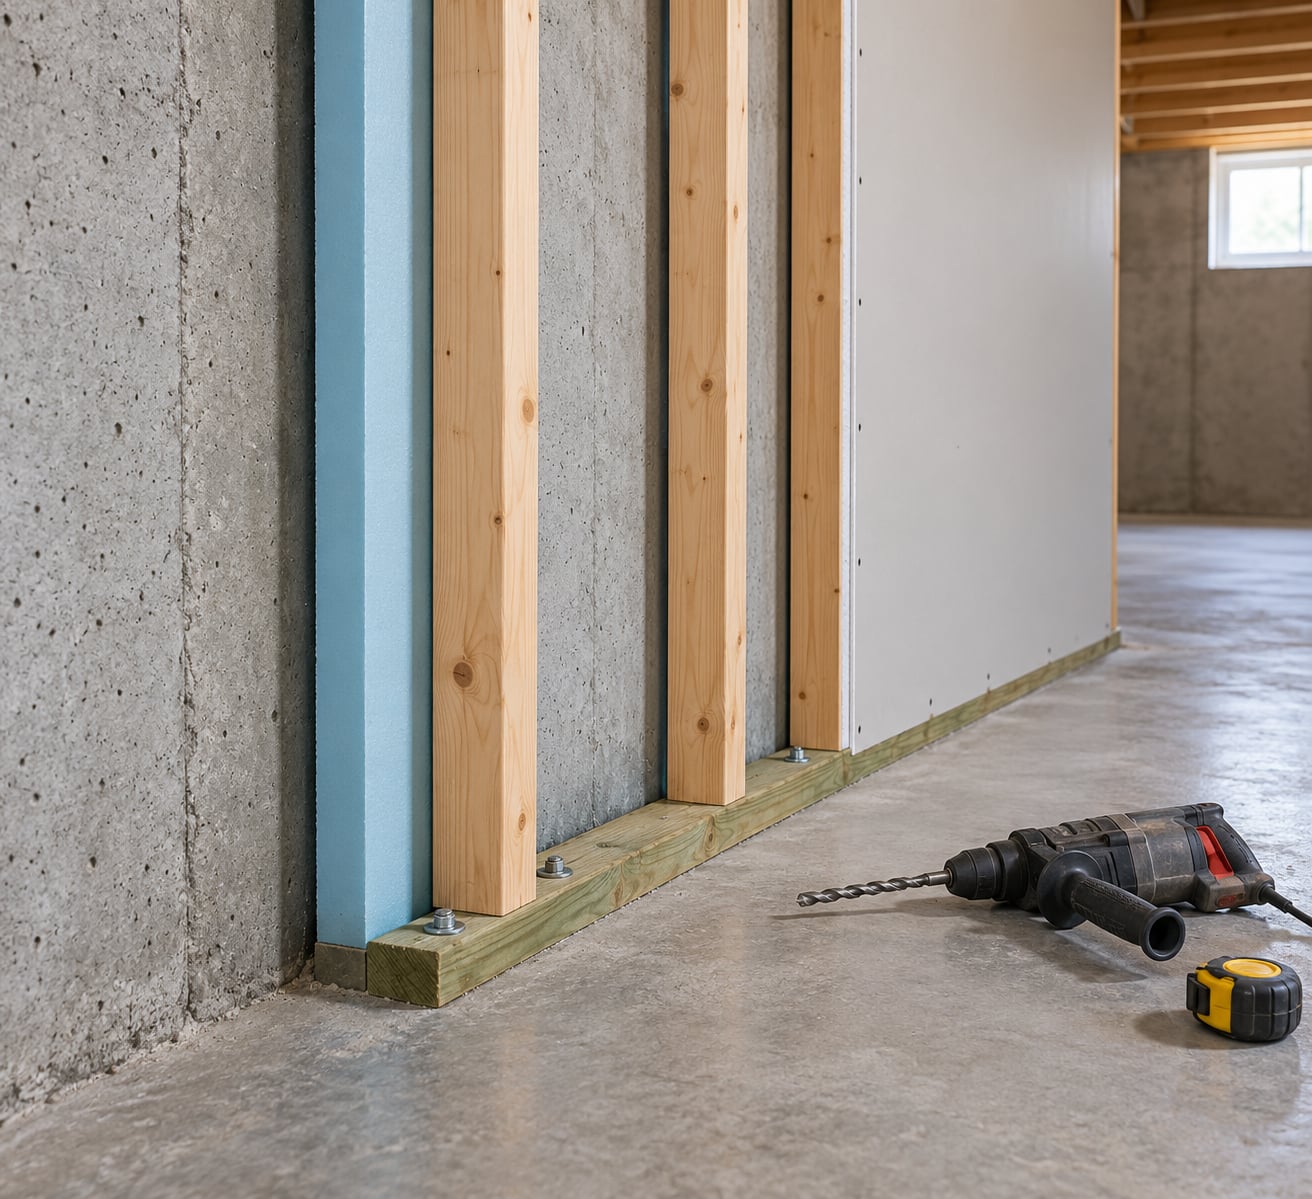
Framing a basement wall against concrete means building a freestanding wood stud wall a few inches in front of the foundation, sealing and insulating the concrete behind it, then anchoring the pressure-treated bottom plate to the slab and the top plate to the ceiling joists. You never fasten wood into the side of the foundation wall. Most of the framing is a weekend of work; the moisture check is the part worth slowing down for.
That first rule trips up more beginners than any other. Everyone assumes the frame bolts to the concrete because the concrete is right there, and then six months later the bottom plate is soft and the drywall corner has a mold stain behind it.
Table of Contents
- What You Need
- Step-by-Step
- How to Frame a Basement Wall Against Concrete Safely
- Mark the Wall Layout and Leave Required Clearances
- Prepare the Concrete and Control Moisture
- Build and Square the Stud Wall
- Attach the Wall to the Concrete
- Plan Wiring, Plumbing, and Ventilation
- Inspect, Insulate, and Cover the Wall
- Common Mistakes
- Frequently Asked Questions
- Should I use pressure-treated lumber for a basement stud wall?
- What insulation should I use between basement studs and concrete?
- What fasteners can I use to attach a stud wall to concrete?
- Can I remove a basement wall and frame a new one in the same place?
- Do I need a permit to frame a nonstructural basement wall?
- Conclusion
What You Need
Nothing exotic, but two groups of materials are non-negotiable: everything rated for concrete, and everything rated for a damp below-grade space. Buying ordinary framing nails and a can of interior paint for this job is the expensive shortcut.
Measuring and layout tools
- 6-foot level, plus a smaller torpedo level for plumbing studs
- Chalk line, chalk, and a pencil that shows on concrete
- Tape measure and a 4-foot straightedge
- Framing square
- Plumb bob, or a laser level if you already own one
Safety gear
- Eye protection, especially when drilling overhead into the slab or joists
- Hearing protection for hammer drill work
- Work gloves and knee pads, because a day on a slab is a day on your knees
- A respirator when cutting rigid foam or mixing masonry coating
Framing lumber
- Pressure-treated sill plate sized to the wall thickness you settled on
- 2×4 studs for a standard-height wall, 2×6 when you want more cavity depth or a taller wall
- Top plate material; two plates if the wall will carry drywall that cannot be removed, one if it will
- Blocking and header material for any opening
- 3-inch framing nails (often sold as 3-1/4 inch) for plate-to-stud connections
Moisture and separation materials
- Masonry waterproofing or elastomeric foundation coating for the concrete
- Rigid foam board matched to your climate zone and code R-value
- Sill gasket, foam gasket tape, or a compatible construction adhesive for the plate-to-slab joint
- Vapor control specified by the project’s wall-system design
Concrete fasteners
- Concrete screws (Tapcon-style) in lengths that clear embedment depth
- Wedge expansion anchors for higher load or cracked concrete
- A powder-actuated nailer only if you are trained, wearing the required eye and ear protection, and working in an area clear of other people
- A hammer drill with the bit size the anchor manufacturer specifies, plus a vacuum or brush to clear holes
References
- Your local building department, for permit rules and inspection sequence
- The framing manufacturer’s span and fastening tables
- The anchor manufacturer’s printed installation instructions, including embedment and spacing
Fasteners and framing connectors have to be approved for the material they go into, the load they carry, and the environment they sit in. Steel that rusts in a damp basement is not doing its job, and an anchor sized for drywall is not doing its job either.
Step-by-Step
How to Frame a Basement Wall Against Concrete Safely
The safe version of this project starts with confirming that the wall you are about to build is a partition and nothing more. If the existing concrete is holding up the house, holding back soil, or carrying a beam, stop and get a structural engineer or your building department involved.
Before the first cut:
- Identify whether the foundation is poured concrete or concrete masonry unit, and look for any beam, post, or column that lands where you want the wall
- Check the finished ceiling height you will be left with after the wall stands up
- Walk the foundation and note every damp patch, white powdery efflorescence, crack, or stain, then watch those spots across a rain cycle
- Locate drains, radon systems, sump pits, and any utility line that runs inside the wall you would frame
If the wall may support the house, retain earth, or hide utilities you have not located, stop there and get professional help. The cost of an hour of advice is trivial next to cutting a post or a drain line.
Once you know the wall is a partition, the whole attachment strategy is short. You have three points of connection, and only three:
- The bottom plate is anchored down into the concrete slab.
- The top plate is nailed up into the floor or ceiling joists above.
- Nothing connects to the side of the concrete foundation wall.
That third point is the entire reason for the standoff. A freestanding wall carries its own weight, keeps interior moisture off cold concrete, and can be opened up later without disturbing the foundation.
Mark the Wall Layout and Leave Required Clearances
Layout is where projects go wrong, because the wall has to fit around things that already exist: doors, windows, outlets, ducts, and the minimum clear opening your code requires for egress.
Set the baseline first. Snap a level chalk line along the slab where the outside face of the bottom plate will sit, then mark the wall ends on the floor and transfer them to the concrete.
Now do the standoff math, because it decides whether the room still works. Most people build: 2 inches of rigid foam against the concrete, then 1-2 inches of air gap so interior air does not wash across the cold surface, then the frame itself at 3-1/2 inches for a 2×4. That totals roughly 7 to 8 inches of wall build-up between the concrete face and the finished drywall face.
Owners on home improvement forums keep running into the same ceiling: on a narrow footing there may be only 3-1/2 inches of slab outside the concrete, and a full standoff assembly does not fit in that. If that is your situation, the options are furring strips on the concrete, a shallower foam thickness where code allows, or accepting a smaller room. Measure your footing before you buy lumber.
Transfer the layout to the concrete:
- Mark every stud location on the slab and on the foundation, 16 inches on center
- Mark door and window openings with their finished rough sizes, including the thickness of the casing and drywall
- Mark clearances required for mechanical equipment, and keep the manufacturer’s service access space open
- Mark egress window clearances, sill heights, and opening sizes your local code requires, since framing the wall wrong here is expensive to undo
- Snap a second line at the top of the bottom plate so you have a reference when the plate is in place
Leave nothing blocking a panel, a cleanout, or a shutoff you will need later.
Prepare the Concrete and Control Moisture
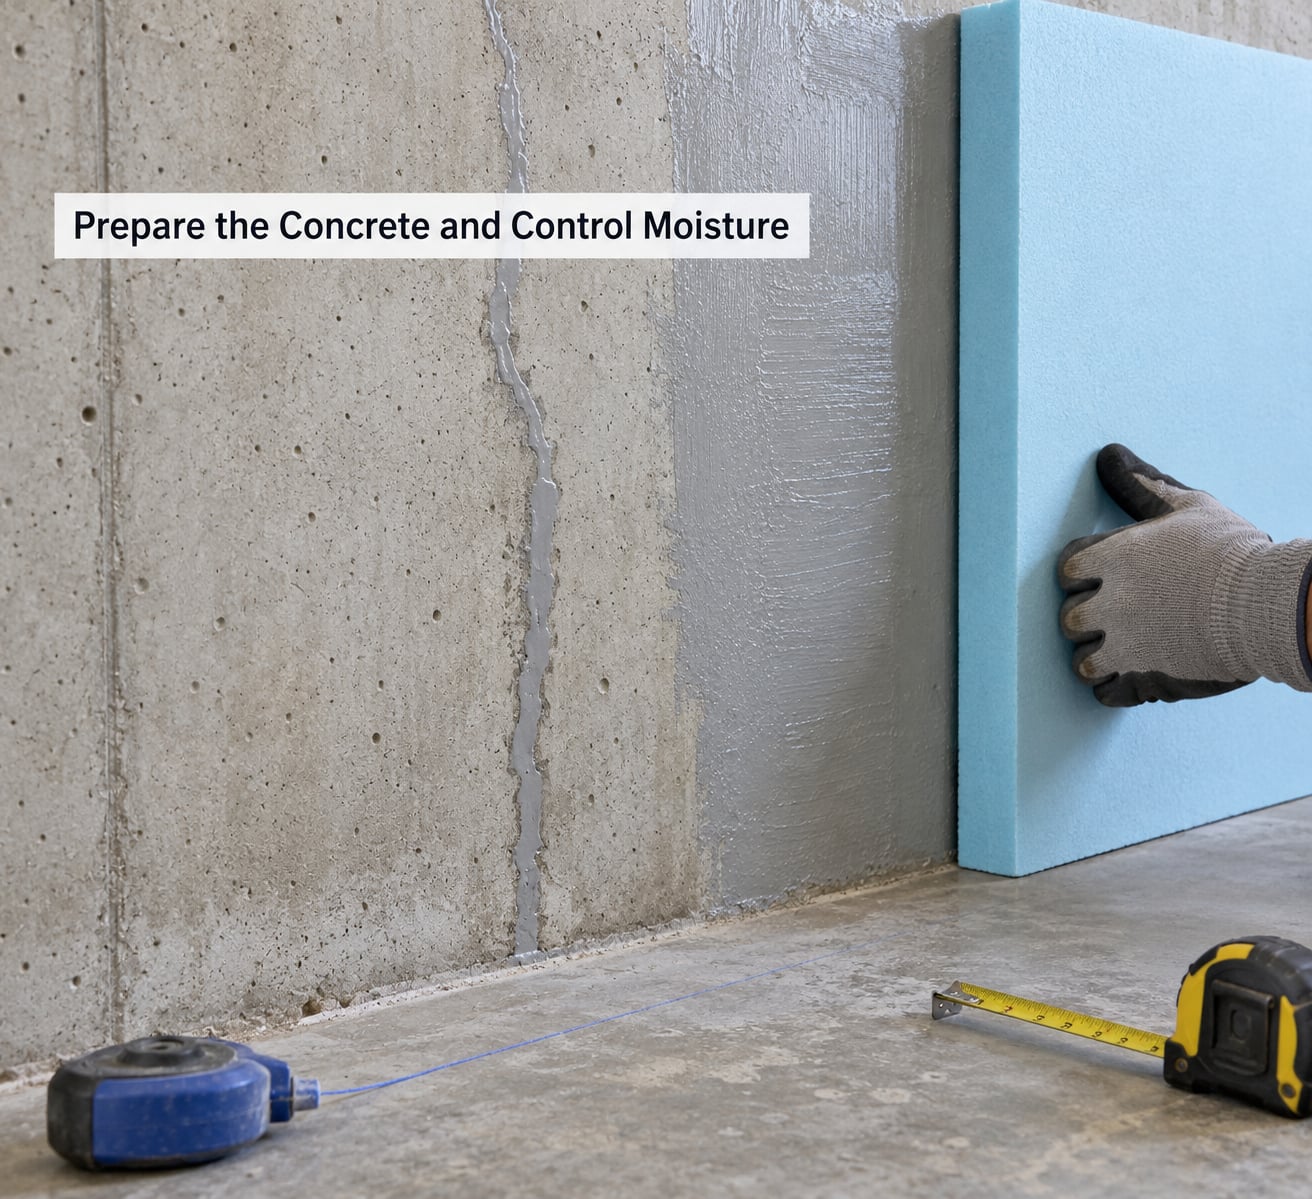
You cannot frame over a wet wall and call it finished. This step decides whether the project looks good in six months or fails.
Start by sorting out what the moisture actually is. Condensation shows up on the coldest part of the wall, often near the north side or below a window, and it disappears when the wall dries. Groundwater intrusion shows up as water staining, a filled cove, or dampness that never goes away. They are different problems with different fixes, and the second one is a foundation issue, not a framing issue.
Then:
- Repair cracks and active leaks first. A hairline crack gets a masonry repair material; an active leak gets resolved before anything else happens.
- Let the wall dry fully. Fans and a dehumidifier do more here than any coating applied over damp concrete.
- Apply a compatible masonry or elastomeric waterproofing coating if the project design calls for it, and let it cure for the time the manufacturer states.
- Install rigid foam to the specified thickness, using an adhesive compatible with both the foam facer and the coating.
- Seal seams, edges, and penetrations so the assembly reads as continuous.
Do not cover an active leak, recurring dampness, white powdery efflorescence, or mold with framing and drywall. Experts on Green Building Advisor and long-time finishers both point to the condensation point on a cold concrete wall as the single biggest cause of mold complaints in finished basements, and framing over it hides the evidence until it is expensive.
One forum thread worth reading before you start: several people tried dropping 4 mil plastic sheeting straight against the concrete, and the response was that this traps the moisture it is meant to manage. An air control strategy chosen for the wall system, not a sheet of plastic, is the better plan.
Build and Square the Stud Wall
Stud height comes from the shortest measurement, taken in several places, minus the thickness of the plates. With a double top plate and a bottom plate, you subtract about 4-1/2 inches from the shortest floor-to-joist dimension; with a single top plate, about 3-1/2 inches.
Size the studs to the job rather than by habit. Home improvement builders generally agree 2x4s are structurally fine for an interior basement partition. People choose 2x6s for insulation depth and for wall height, not because the 2×4 is too weak, and that costs you room width every time.
Building order that works:
- Cut all studs to length and mark them for their position on the wall.
- Lay the pressure-treated bottom plate flat on the slab and mark the 16-inch centers directly on it.
- Stand studs on the marks, check each for plumb in both directions, and nail through the plate into each stud with 3- to 3-1/2-inch framing nails.
- Keep the bottom plate continuous unless a verified design specifically calls for something else.
- Add blocking between studs wherever the design calls for it, including behind future towel bars, cabinet rails, and heavy fixtures.
- Build any door or window opening in the same plane, with the king studs and jack studs in place before you cut the opening to size.
- Add the top plate, nail the stud ends to it, then square the whole assembly by checking diagonals before it moves.
Ask your drywall installer which thickness of board you will use and build any gap accordingly. Sheathing or a thicker membrane changes the finished dimension, and you want the mismatch resolved here rather than at the drywall stage.
On a long wall, build in sections of four to eight feet and connect them with a stud or blocking at the joint. A tall 2×4 wall built in one piece is much harder to stand, and a section that falls over takes less of the wall with it.
Attach the Wall to the Concrete
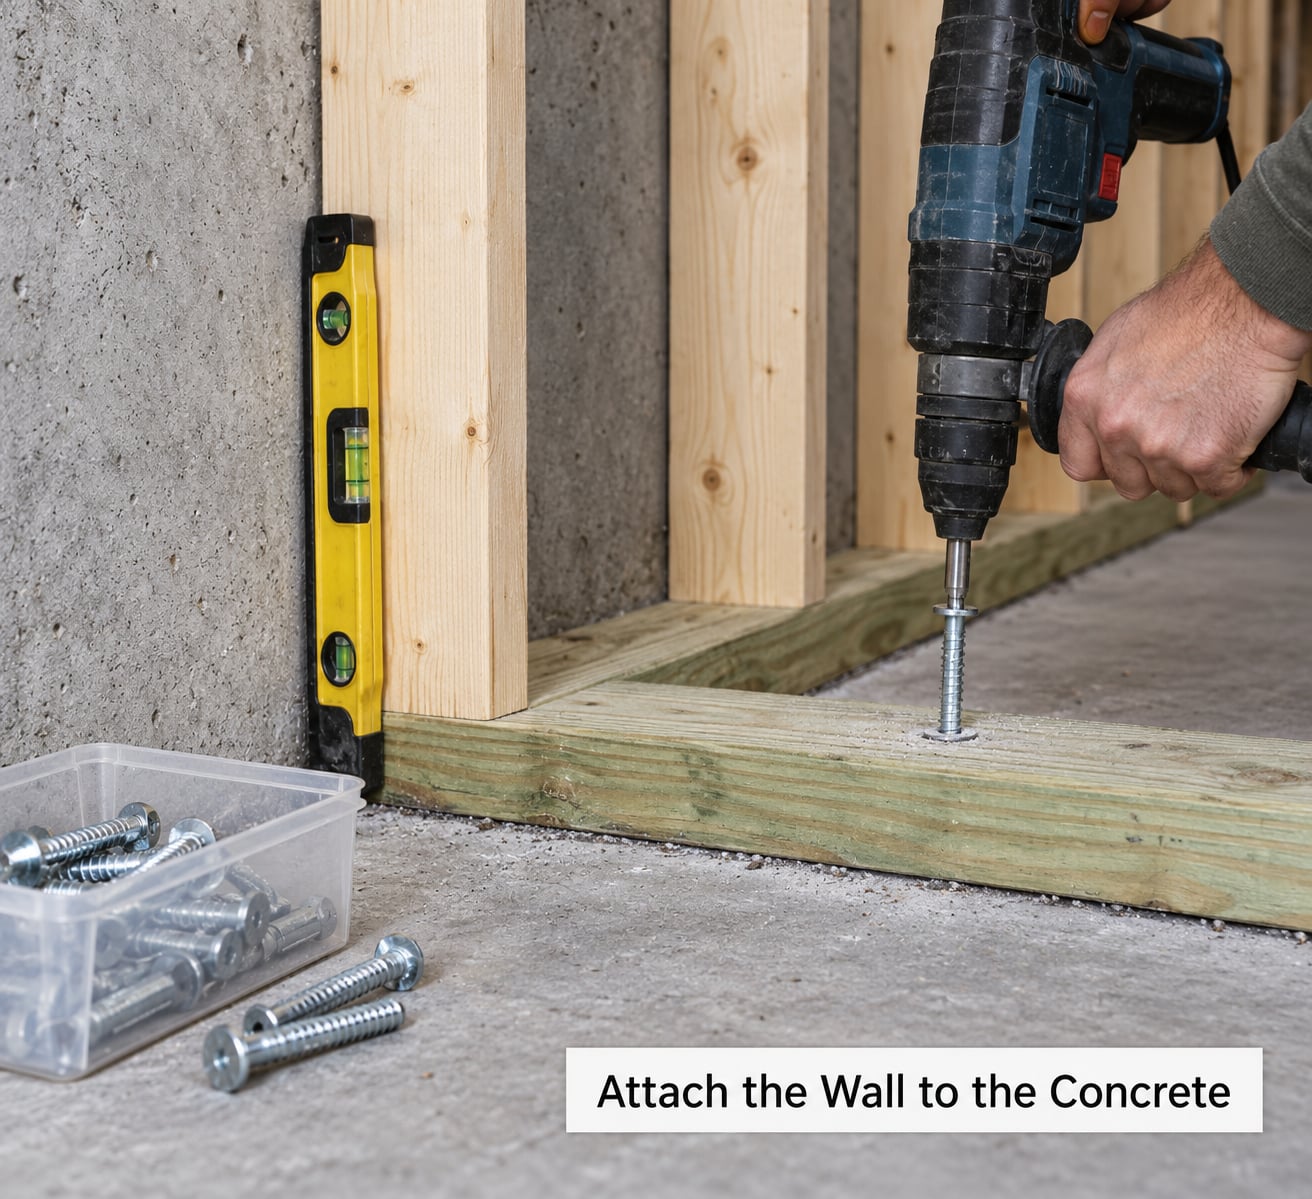
This is where the plan changes from carpentry to anchoring, and where most first attempts go wrong. Ordinary nails do not hold in concrete, and hammering them in splits the plate and can punch a chunk out of the slab.
How it goes:
- Stand the wall in position against your layout line and brace it so it cannot tip.
- Align it with the chalk lines and check plumb on the full height of the wall.
- Mark fastener locations at the spacing and edge distances your framing manufacturer, anchor manufacturer, and local requirements specify.
- Drill with a hammer drill at the hole size the anchor requires, not the shank size.
- Clear each hole completely before setting the fastener. Concrete dust left in the hole reduces holding strength.
- Install corrosion-resistant, concrete-rated anchors and re-check plumb at each end and the middle.
Choose the fastener for the load and the condition. Concrete screws are fast and work well in sound concrete at a modest spacing. Wedge expansion anchors suit higher loads and questionable concrete. Powder-actuated nails are fast and common for bottom plates, but they require training, hearing and eye protection, and a clear work area. Chemical anchors are the answer when a layout conflict leaves you too close to an edge, and they have a cure time you have to respect.
Attach the top plate to the joists with the joist fasteners your framing tables call for. If the joists run perpendicular to the new wall, there is nothing to nail into, so add blocking or a header between joists and fasten to that instead. Owners hit this regularly and it is the moment the job turns into carpentry rather than anchoring.
Plan Wiring, Plumbing, and Ventilation
Decide where electrical boxes, plumbing, and vent paths run before the wall is covered, because cutting into a finished stud wall to fix a box location is a small nightmare.
- Keep box locations clear of studs, blocking, and fasteners, and set box height and position to the electrical code that applies to you
- Leave plumbing clearances the pipe fitting and the inspector expect, and remember drain lines need slope and venting space
- Provide access panels over valves, cleanouts, and anything an inspector needs to see
- Keep supply and return paths open so ducts are not crushed and combustion appliances keep their required combustion air
- Add blocking where a future fixture will land, before the drywall goes up
Electrical and gas work must be planned and performed by qualified professionals under the applicable codes. Nothing in this guide replaces that.
Inspect, Insulate, and Cover the Wall
Before insulation, walk the wall and check it honestly: level along the bottom, plumb end to end, square at the corners, fasteners tight, and no movement when you push on it. Then check that the clearances you marked at layout are still clear.
Insulation type, air control, and where any vapor control belongs follow the wall-system design for your climate zone and the rest of the assembly. Experts on Green Building Advisor make the point that the assembly matters more than any one product: rigid foam against the concrete, an air gap where the design calls for one, and cavity insulation chosen for flood resilience. If your plan calls for continuous exterior insulation over the concrete, get a professional review first, because the compression and the vapor profile both change what belongs inside the cavity.
Then cover it. Leave the wall accessible at any point your inspector needs to see, and do not close a wall before the required inspection if one applies in your jurisdiction.
Common Mistakes
Most bad basement walls trace back to one of these, and each has a straightforward correction.
- Fixing the frame to the side of the concrete. Correction: anchor the bottom plate to the slab and the top plate to the joists, and keep the frame freestanding.
- Treating a possible structural or retaining wall as a partition. Correction: confirm the wall’s role before you build, and ask an engineer if there is any doubt.
- Covering damp concrete. Correction: identify the moisture, fix leaks, dry the wall, then frame.
- Using fasteners not approved for concrete or for the load. Correction: use concrete-rated anchors at the specified spacing and embedment.
- Standing the frame directly against wet concrete with no gap. Correction: build the foam and air gap layers into the assembly so moisture is not trapped.
- Blocking a required clearance. Correction: re-check egress, mechanical access, and panel clearances before covering.
- Omitting blocking. Correction: add blocking at fixture locations and at connection points while the wall is still open.
- Over-fastening or driving nails too close to the plate edge. Correction: set nails where the fastening schedule calls for them and let the fasteners do the work.
- Covering the wall before it has been checked. Correction: complete any required inspection first.
A few safety habits worth repeating: wear eye protection near the slab and overhead, treat every powder-actuated tool as live ammunition and keep bystanders out of the line, check for radon and utility lines before you drill, and stop when a wall stops being simple.
Frequently Asked Questions
Should I use pressure-treated lumber for a basement stud wall?
Yes, for the bottom plate only. The sill plate sits on a damp slab, so pressure-treated lumber is the standard choice there. The studs and top plates stay in ordinary framing lumber unless your local code requires treated material throughout. A sill gasket or compatible adhesive under the plate adds separation from the slab. If a large section of the plate will be cut out for a large window or door, that piece still needs to be treated.
What insulation should I use between basement studs and concrete?
The assembly usually has two parts: rigid foam against the concrete, and cavity insulation between the studs. Required foam thickness follows your climate zone and local energy code. For the cavity, mineral wool is common because it tolerates a flood better than fiberglass, and it fits the depth of whichever stud size you chose. Do not treat any single product as the answer on its own; the air control and vapor strategy has to match the whole wall.
What fasteners can I use to attach a stud wall to concrete?
Concrete-rated anchors are the answer: Tapcon-style screws for sound concrete at normal spacing, wedge expansion anchors for higher loads or questionable concrete, and powder-actuated nails where a trained operator has a clear work area. Chemical anchors suit a spot too close to an edge for a mechanical anchor. Embedment depth and spacing come from the anchor manufacturer, and every hole gets cleared before the fastener goes in.
Can I remove a basement wall and frame a new one in the same place?
Usually yes, because a partition wall carries its own weight rather than carrying the house. Confirm that the wall is not bearing a beam, holding back soil, or hiding a utility before you touch it. Removing a wall does not mean moving it next door: the new wall still needs its standoff, foam, air gap, and slab anchors in the same spot. Expect the same layout, moisture, and clearance checks all over again.
Do I need a permit to frame a nonstructural basement wall?
It depends on where you live, and many jurisdictions want one for any wall that encloses living space. Electrical, plumbing, gas, HVAC, and egress window work almost always pull a permit regardless of the framing. Call your building department before you start and ask specifically about nonstructural interior partitions and whether an inspection is required before drywall. Rules and inspection sequences change, so confirm current requirements in your area rather than assuming.
Conclusion
Two things come before the lumber list. First, confirm the wall is a partition and not something holding up the house or holding back soil. Second, find out what the moisture in that wall is doing, because framing hides the evidence.
Then build a freestanding frame: standoff distance for foam and air gap, a pressure-treated bottom plate anchored into the slab with concrete-rated anchors, 2×4 studs at 16 inches on center, a top plate fastened into the joists or into blocking you added, and nothing touching the side of the concrete wall.
Get the layout, the fastener spacing, and the insulation design from written tables rather than memory, and check with your building department about permits and inspection before you cover anything.