To make an older home more energy efficient, work in order: fix the air leaks first, add insulation only where it is genuinely missing, service or replace the heating and cooling equipment, then move to windows, water heating and controls. Most of the waste in a vintage home comes from air moving through cracks that were never meant to be there, not from the heating system itself, and that part is fixable in a weekend.
An older home was built to code from a century ago, sometimes before insulation existed at all. Before 1920 the norm was an uninsulated attic, single-pane glass and a furnace with a chimney doing most of the work. That is why bills jump in February and why one bedroom can be freezing while the rest of the house is fine.
The mistake I see most often is buying equipment first and diagnosing later. A new furnace installed into a leaky envelope runs harder, costs more to run, and still leaves the drafts in place. Spending the first hundred dollars on a real diagnosis saves thousands down the road.
Plan on weeks, not days. Sealing and weatherstripping are weekend work. Insulation, duct work and equipment replacement are contractor jobs that need permits, sizing calculations and sometimes a structural look. Read on and you will know which is which.
Table of Contents
- What You Need
- Documents and records
- Diagnostic tools
- Supplies and safety gear
- How to Make an Older Home More Energy Efficient Step by Step
- 1. Start with an energy audit and comfort check
- 2. Seal uncontrolled air leaks first
- 3. Improve insulation where it is missing or damaged
- 4. Service or replace inefficient heating and cooling equipment
- 5. Reduce losses from old windows and doors
- 6. Lower water-heating energy use
- 7. Improve duct performance and control household energy use
- Common Mistakes
- Frequently Asked Questions
- What wastes the most energy in an older home?
- Is a home energy audit worth it?
- Can you insulate old house walls without removing drywall?
- Are storm windows as good as replacement windows?
- What is the most efficient heating system for an old house?
- What is the safest first improvement in an older home?
- Conclusion
What You Need
Gather these before you touch anything, because half of what looks like a heat problem is really a comfort problem you can measure.
Documents and records
- Twelve months of utility bills, so you can see when and how much you actually use
- Any remodels, permits or contractor paperwork from past work
- Your heating and cooling equipment nameplate data, usually on a sticker inside the furnace closet or on the outdoor unit
- Plans or drawings if you have them, especially for balloon-frame or brick homes
Diagnostic tools
- An infrared thermometer to compare wall, window and ceiling temperatures from the same room
- A digital hygrometer placed in a few rooms for a week to spot condensation and moisture problems
- A flashlight, a smoke pencil or a thin ribbon for finding drafts
- A tape measure, not a laser distance finder, when you are sizing window and door seals
Supplies and safety gear
- Caulk rated for interior or exterior use, plus a caulk gun and a plastic scraper for removing old beads
- Weather-stripping in three profiles: foam tape for small gaps, V-strip for sash edges, and rolled vinyl or brass for deep channels
- Nylon or metal draft stoppers for the bottom of exterior doors
- R-30 or heavier attic insulation, a vapor retarder appropriate to your climate, and a raised walkway for safe access
- Safety glasses, a dusk mask and gloves, because old insulation can contain fibers you do not want to breathe
If your house was built before the 1970s, treat any drilling, cutting or disturbance of paint or plaster as a lead and asbestos question until an inspector says otherwise. That caution is not optional.
How to Make an Older Home More Energy Efficient Step by Step
Here is the sequence that works, roughly cheapest first. Every step has a way to tell whether it actually helped, so you are never guessing at the end of a project.
1. Start with an energy audit and comfort check
Before you spend money, spend a weekend finding out where the energy is going. The cheapest audit is the one you do yourself: walk the house with the smoke pencil, feel every baseboard, check the attic and the crawlspace, and note which rooms never settle at night.
Look for these specific symptoms. Cold spots by windows and an ice-prone upper corner of a wall usually mean missing insulation. Streaked paint, musty closet air and dark marks around plumbing penetrations point to moisture problems, and moisture must be fixed before anything is added to the wall. A room that stays cold while the hallway is warm usually points to duct sizing or balance rather than the envelope.
A plug-in heat-cost meter gives you an hour-by-hour number for the power your HVAC actually uses, which is more useful than a guess. From there, do this checklist:
- Compare bills by degree-day rather than by month, so a mild January is not mistaken for success
- Photograph and date the same corner of each room in January and July
- Check whether the attic insulation is continuous over the joists or has bare rafter bays
- Confirm that the dryer and range are vented outdoors, not into the attic or a closet
- Look for a working smoke and carbon monoxide alarm on every level before you start any work
Hire an independent energy auditor when the home is over about 1,500 square feet, when you suspect problems inside walls or ducts, or when the cheap fixes do not move your numbers. An audit typically runs a few hundred dollars, and a blower-door test alone will tell you how much air is moving through the envelope. Ask for before-and-after results so you know what changed.
If you are wondering how to make an older home more energy efficient and you have not measured anything yet, this step is the answer. Whatever the diagnosis turns out to be, you now have a baseline you can compare against later.
2. Seal uncontrolled air leaks first
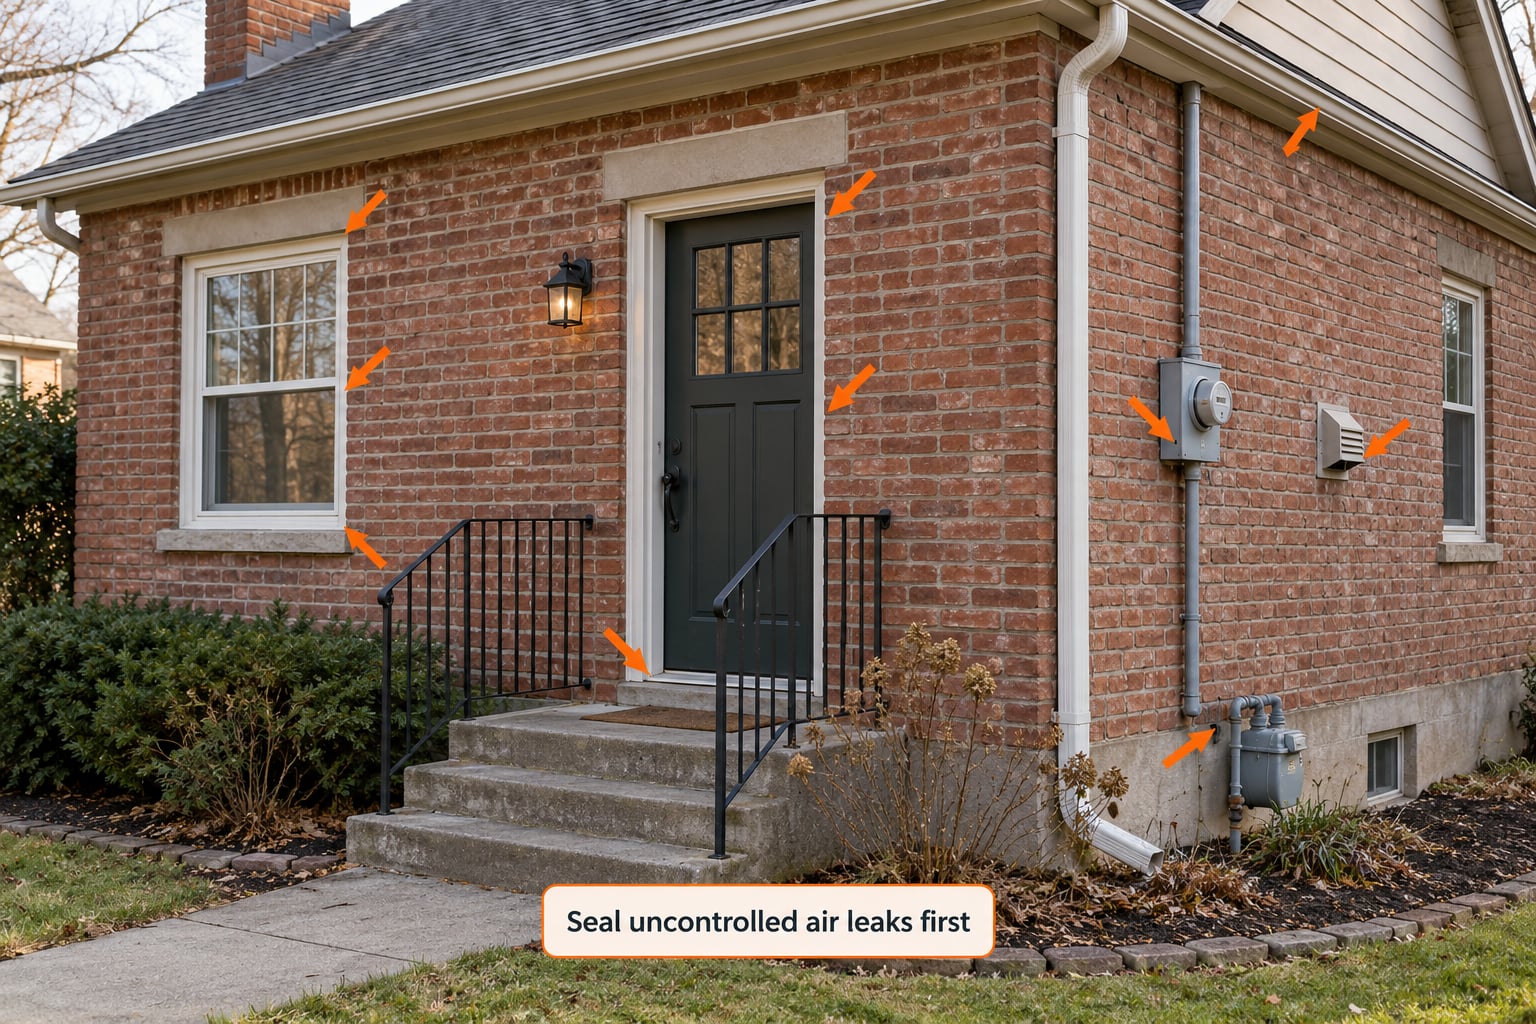
Air sealing delivers more per dollar than anything else you will do, and in most older homes it is the first real project. Air that leaks out in winter carries the heat with it, and air that leaks in summer carries humidity and dust.
Work from the biggest, ugliest openings down. Start with the attic hatch or stair door, add an insulated cover and gasket it. Move to plumbing and electrical penetrations in the attic or exterior walls, sealing around pipes with sealant that stays flexible. Do not seal in a way that blocks required combustion air for a furnace or water heater.
Then check the flues and vents you should not seal: dryer and bathroom exhaust, kitchen hood, combustion air intakes and any chimney that serves a working fireplace. Sealing a required vent is a safety problem, not just an efficiency problem.
Inside, the money spots are the top of a hopper window, the sides and bottom of the window casing, the gap where a door meets its jamb, the top of an interior wall that runs to the attic, and the electrical outlets on exterior walls. For a quick check, turn on exhaust fans in the bathroom and kitchen and feel for incoming air at those spots with the smoke pencil.
Leaky ducts in an attic or crawlspace are another large leak. If the ducts sit outside the conditioned space, sealing the joints with mastic and adding proper insulation around them pays off quickly, but do not cut into ducts you have not located and do not pinch flexible duct by stapling it tight to framing. That one mistake shows up as rooms that never cool down.
Professional blower-door testing is worth it when the house has unusual construction, hard-to-reach flues, or you plan a major retrofit. The test pressurizes the house to a standard pressure, measures the air changes per hour, and gives you a number to compare before and after.
3. Improve insulation where it is missing or damaged
Insulation only pays off when it is continuous, dry and thick enough. Gaps at wiring, recessed lights and rim joists work like chimneys, moving more heat than the surrounding batts.
Begin at the attic, because it is the easiest and most effective. Check the depth by measuring the joists and comparing against your local code target, which in most of the country falls somewhere around R-30 to R-60 for the attic floor. Lay new insulation over the old and fill the joist bays with loose fill or batts so there is no thermal bridging down to the ceiling.
Two warnings for old attics. If you find knob-and-tube wiring or early cloth-sheathed cable, have an electrician replace or re-route it before you disturb it. And if you see dark staining, wet insulation, or evidence of roof or chimney leaks, fix the water first, then insulate.
Crawlspaces and basements come next. In a ventilated crawlspace, most owners end up lining the walls with rigid foam or spray foam and adding a vapor retarder to the ground, which pulls the crawlspace into the conditioned envelope and cuts heat loss dramatically. Do not insulate a crawlspace that holds standing water.
Walls are the hard case. Best practice is dense-pack cellulose blown into the cavity because it fills irregular spaces and resists air movement better than loose fiberglass, but you can only do it from outside or after removing drywall. Retrofitting interior wall insulation without opening the wall generally does not pay off, which is a genuinely useful thing to know before you start tearing lath and plaster apart.
4. Service or replace inefficient heating and cooling equipment
Start with the free things. Replace or clean the furnace filter on schedule, and if your system has one, clean the evaporator coil. A clogged filter can cut airflow enough that the unit runs constantly and the house never catches up. Check the outdoor unit for debris-packed fins and keep two feet of clearance around it.
Look at the age and efficiency label on the equipment. A furnace reading a low percentage efficiency and a decade past its service life is doing more work than it needs to, and every dollar of fuel it wastes goes straight out the flue. Age alone is not a reason to replace a well-built unit, but age plus rising bills plus uneven heating is.
Any refrigerant work, gas connections, new ductwork or equipment changes go to a licensed HVAC contractor. Replacing a furnace or air conditioner without a proper load calculation is the single most common way homeowners spend money and get nothing. A unit that is too large cycles short, does not dehumidify well and strains its parts. Any reputable contractor should be able to show you the room-by-room load calculation in the proposal.
Heat pumps now work well in many older homes, including ones with radiators if the sizing and hydronic setup are handled correctly, and mini-splits can serve an older house that has no usable ductwork at all. Both usually want backup heat in a cold climate, and both need the electrical capacity checked before installation.
On the thermostat side, a programmable unit pays off on the first month you use it, even on an old hydronic system. A smart thermostat saves more but varies a lot by how well the underlying equipment communicates.
5. Reduce losses from old windows and doors
Original wood windows are not automatically energy sinks, and that is the most useful thing to know on this whole list. Most are air leaks around the sash, not failures of the glass, and the gap can be closed for a fraction of what new windows cost.
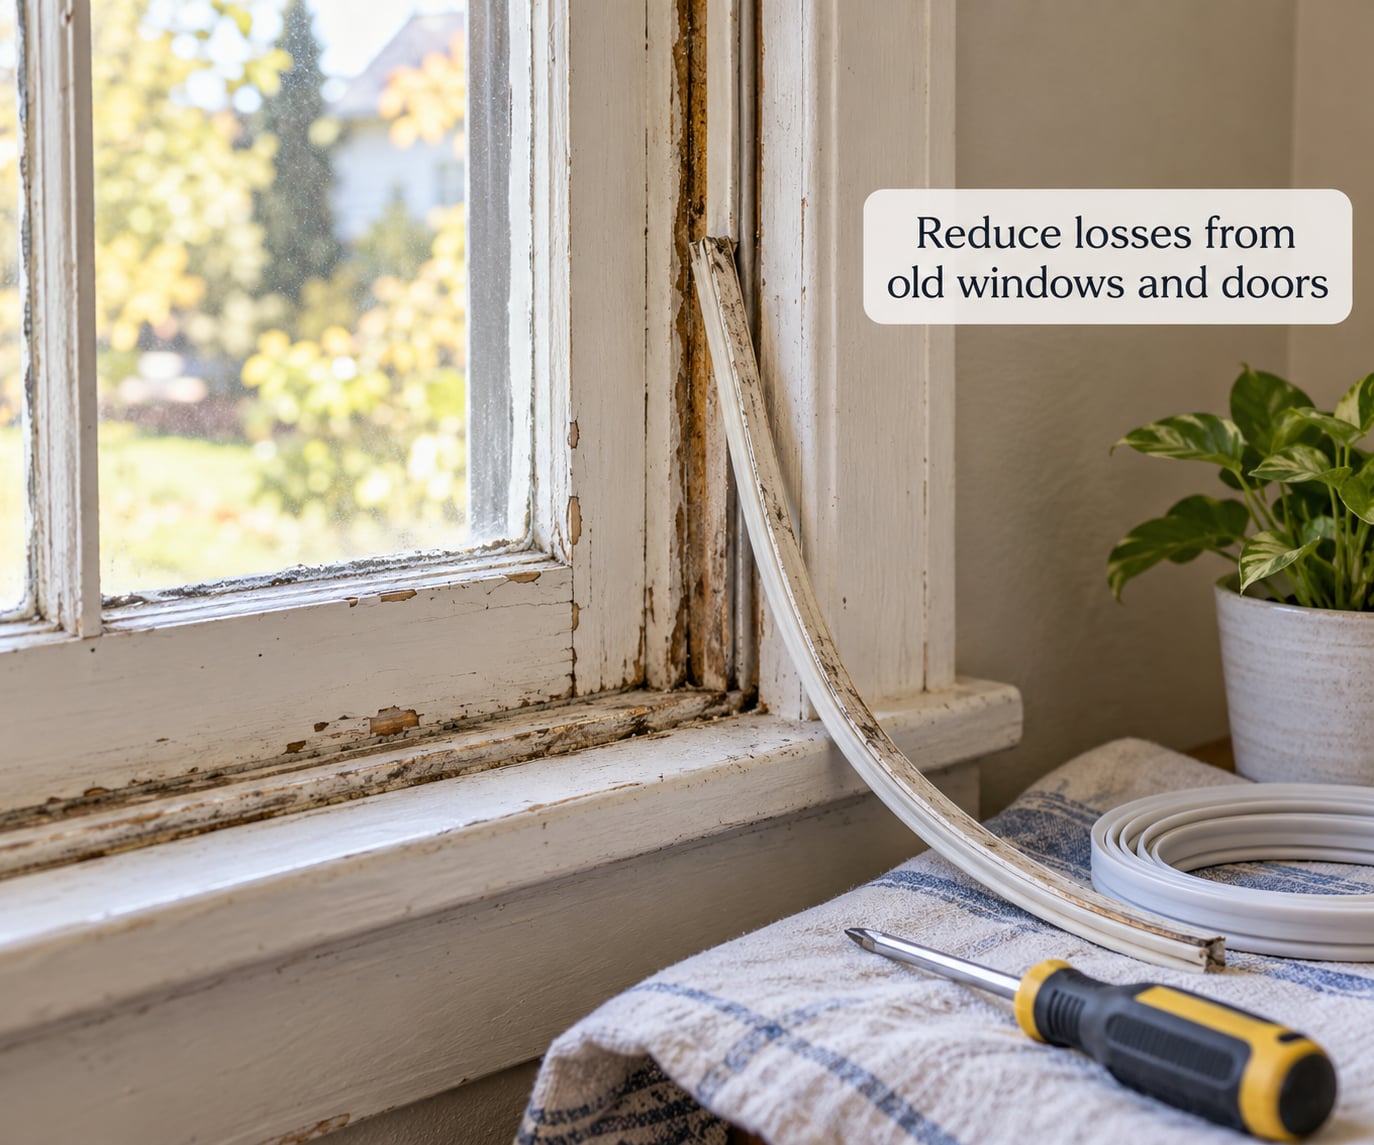
Work in this order. First remove and repair any broken putty, then scrape loose paint, prime bare wood and repaint. Paint is the seal on a wood window, so bare, cracked wood means water gets in and the frame rots. Next add weather-stripping to the sash channels and a sweep or seal along the sill. Only after the sash is tight do you move to the casing gaps.
Insulated interior or exterior storm panels add a second air space at a fraction of the cost of replacement and preserve the historic window. Low-emissivity storm glass blocks more heat than clear glass, and exterior shade helps more with summer heat than most window films do. If the window is already rotted through, rotted and warped past sealing, or the historic district rules out interior storm panels, replacement with a window of matching proportions is the honest answer.
Exterior doors leak around the jamb and at the threshold. Add a draft stopper, adjust the hinges so the door seats properly, and check that the door is not warped against the frame. An uninsulated steel slab is a wall of its own; insulating the slab or adding a storm door helps more than stripping the frame.
6. Lower water-heating energy use
Water heating is usually the second-largest energy use in a home after heating and cooling, and here the savings are mostly free. Set the tank to about 120 degrees Fahrenheit, which is safely below the scalding range and enough for nearly all household use. Every 10 degrees you turn it down is roughly 5 percent less energy going into keeping water hot.
Lower-flow showerheads and faucet aerators cut hot water volume without any change in habit, and insulating an older tank that lacks an insulation jacket cuts standby losses noticeably. Check the pressure relief valve and the drain at the bottom once a year, and replace the anode rod if your water is hard.
A heat-pump water heater typically uses less electricity than an electric tank of the same size and can be added without fluing through a new vent in some homes. Tankless models need gas or a large electrical supply and take longer to deliver hot water to distant fixtures. Any replacement involving gas, venting or a new electrical circuit belongs to a licensed plumber or installer.
7. Improve duct performance and control household energy use
The part of the system most owners ignore is the part that delivers and returns air. Do the accessible maintenance yourself: change filters on time, open every return grille each year and vacuum behind furniture that pushes against them, and cut back any plants or rugs blocking a vent. Recutting or rebalancing central ductwork is not a homeowner project.
On the habits side, LED bulbs throughout the house, smart power strips for entertainment gear, and closing shade on sun-facing windows in summer all reduce load without touching the structure. Running dishwashers and laundry machines off peak hours moves cost but not consumption, so only do it if your utility actually rewards the timing.
Run bathroom and kitchen exhaust fans during and after showers and cooking, especially in winter when the house is tight. Sealing an old house changes the ventilation equation, and running a combustion appliance in a house with no makeup air is a carbon monoxide risk that shows up more often after a big sealing project.
Common Mistakes
Almost every expensive regret in an older home comes from doing things out of order.
Sealing or insulating before fixing moisture. Trapping wet material inside a wall causes rot and mold. Resolve leaks, wet basement problems or condensation before adding insulation.
Covering up vents to stop drafts. Blocking return grilles starves the furnace and air conditioner, and sealed combustion appliances can backdraft.
Replacing the furnace before diagnosing the envelope. A new unit in a leaky house runs harder and never pays back. Diagnose first.
Adjusting combustion equipment yourself. Changing burners, flue settings or gas connections belongs to a licensed technician. So does any refrigerant work.
Skipping the permit. Insulation, duct work, electrical changes and equipment swaps usually need permits, and unpermitted work can complicate a future sale.
Making electrical changes you cannot verify. Knob-and-tube wiring and obsolete panels need a licensed electrician, not a weekend project.
Oversizing a replacement HVAC system. A unit too large for the space cycles inefficiently and fails early. Insist on a written load calculation.
If you only remember one prioritization tip, remember this: fix what you can measure, in the order of air, insulation, equipment, then everything else. Each step should be verified with a blower-door test, a new thermostat reading or a corrected bill before you fund the next one.
Frequently Asked Questions
What wastes the most energy in an older home?
Uncontrolled air movement is usually the biggest culprit. Hot air escapes through attic penetrations, window casings, door jambs and ductwork outside the conditioned space, carrying heat with it. Missing or compressed insulation is usually second, especially thin attic floors and uninsulated crawlspace walls. Old single-pane windows and an aging furnace or water heater add to it. A blower-door test confirms how much air is actually moving.
Is a home energy audit worth it?
Usually yes, especially if you have never had one and you are planning a major purchase like a furnace or windows. An auditor finds the specific leaks and missing insulation, runs a blower-door test, and gives you a prioritized list instead of a generic improvement list. The fee is typically a few hundred dollars. Skip it only if you are confident your problem is a single obvious item, such as one drafty door.
Can you insulate old house walls without removing drywall?
Rarely. Dense-pack cellulose blown into a cavity needs an access point from outside or through the drywall, and wall insulation applied from the interior face of an existing wall typically performs poorly because of the existing plaster and lath. If your siding can be removed or your wall is already open, dense-pack cellulose is a good choice. Otherwise, focus on the attic, crawlspace and air sealing first, where the return is much better.
Are storm windows as good as replacement windows?
For air leakage, close. Insulated interior or exterior storm panels create a second air space against the original glass and typically cut window air loss dramatically for a fraction of what new windows cost, which makes them a strong choice for historic homes or ones in a preservation district. Replacement windows win on clarity, hardware and low-emissivity glass options. Keep and repair original windows if the frame is sound.
What is the most efficient heating system for an old house?
It depends on the house. A ducted or ductless heat pump uses less fuel than a gas furnace or boiler, but only if it is correctly sized and the house’s loads have been calculated. In a very cold climate you will likely need backup heat. Older homes with working hydronic radiators can sometimes be paired with a heat pump, but that is a design job for an HVAC contractor, not a swap.
What is the safest first improvement in an older home?
Air sealing in a small, contained area such as the attic hatch, plumbing penetrations and window trim is a good first move because it is reversible, inexpensive and easy to inspect. Before you start, confirm you have working smoke and carbon monoxide alarms on every level, and check that no knob-and-tube wiring or deteriorated paint will be disturbed.
Conclusion
To make an older home more energy efficient, the order matters more than the ambition. Find out where the energy goes with a comfort check and an energy audit, seal the air leaks, add insulation where it is genuinely missing and dry, then look at heating, cooling, windows and water heating in that order.
Start this month with the free work: your bills, your hygrometer readings and a walk through the attic and crawlspace with a smoke pencil. That costs almost nothing and it tells you what the real problem is before a contractor tells you for you. Then verify each step before you fund the next one.